Summertime Means- Dense Bean Salad Time (Recipe Included)!

If you aren’t on social media a lot, you probably haven’t heard of the dense bean salad craze. Pioneer to buy Violet Witchel, former culinary student and master of the dense bean salad, she rose a popularity about a year ago with a video talking about her weekly meal prep and how it included a dense bean salad.

A dense bean salad is a salad that features beans as well as other hearty vegetables in a light oil and vinegar dressing. It can be stored in the fridge for up to five or six days, and like most things, it gets better the longer it sits in the fridge.

I have been making them for a few months, and I am in love. It is a great way to increase your fiber intake, enjoy a protein-based meal that does not have meat in it, and it’s a good way to eat seasonal veggies.

Here is the basic format.

Pick two kinds of beans: black beans, garbanzo beans, pinto beans, navy beans, cannellini beans, or even edamame. Whether you use canned rinsed and drained beans, or make them in your Instant Pot, or in the case of edamame, steam a frozen bag, your base all begins with beans.

You need at minimum 2–4 veggies. Popular choices include red onions, cucumbers, tomatoes, bell peppers, corn, celery, carrots, shaved cabbage/coleslaw mix, avocado slices, or shaved Brussels sprouts. Other flavorful options include finely chopped herbs, like parsley, cilantro, or dill.

If you like pickled veggies, beets, banana peppers, pickled jalapeños, olives, even oil-packed veggies like sun-dried tomatoes are a great choice.

Next, you need a salad dressing. Oil and vinegar or an acid like fruit juice and oil is a great choice. Check out my simple vinaigrette infographic for some ideas.

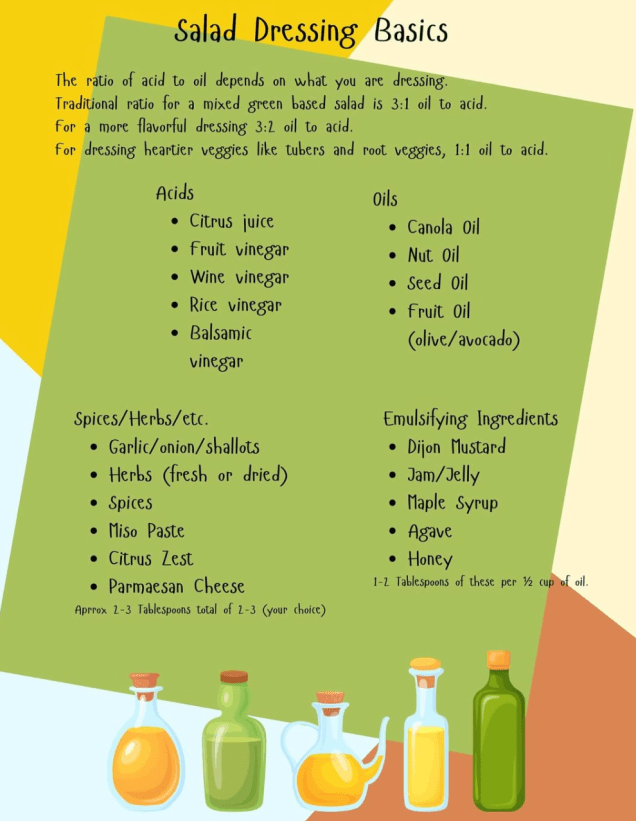
If you like cheese, I recommend feta, but other good choices include cubes of hard cheeses, or mini mozzarella pearls. Soft cheese like queso Fresca is also good.

Some people like to add a cooked grain. Examples include Farro, quinoa, bulgar, or couscous (regular or Israeli). I would not add rice, or any sort of pasta. In my mind, pasta salads are a different dish and usually don’t involve beans.

Here is my recent Dense Bean Salad:

  • 1 14-ish ounce can Garbanzo Beans
  • 1 14-ish ounce can cannellini beans
  • 1 red bell pepper, diced
  • 1 yellow bell pepper, diced
  • 1 green bell pepper, diced
  • 1/2 purple onion, diced and soaked in ice water (remove from ice water before adding to salad)
  • 3 ribs celery, diced
  • 1/2 cup crumbled feta
  • 1/2 cup olive oil
  • 1/2 cup freshly squeezed lemon juice
  • 1 tablespoon Dijon mustard
  • Zest of 1/2 lemon
  • 1 tablespoon Oregano
  • 1 tablespoon Basil
  • 1/2 teaspoon granulated garlic
  • dash of crushed red peppers
  • Salt and pepper to taste


March is frozen food month: What kind of food can you freeze?

It’s true: March is frozen food month. In previous years, there were deals and sales on frozen foods that you just couldn’t be beaten. But with the changing economic climate, a lot of these offers and deals have sort of dried up.

That brings us to what you can freeze. A lot of us are taking advantage of what little sales we can find, stocking up on pantry staples, and making sure that our pantries and freezers are full of food and ingredients. Freezing food is also a great way to keep leftovers that you may not want to eat within the next two or three days after making them.

I freeze a lot of stuff. When I make batches of soup, I tend to freeze 2 to 4 portions of it so that we can have a meal later, and all I have to do is defrost and heat.

When we have fruits and vegetables that are getting a little too ripe for us to eat, I will chop them and put them in Ziploc bags in the store in the freezer.

Here are other things that you can freeze with a little bit of prep work:

Shredded or grated cheese. Blocks of cheese tend to crumble when defrosted.

Milk: Unopened gallons of milk, can be stored. I recommend you open and pour off/drink about a quarter of a cup before you put the lid on tightly and put back into the freezer. This step is not needed with paper curtains. 

Bread/muffins/tortillas: Make sure you put it in a freezer-safe Ziploc container/bag to keep it from getting freezer-burnt. 

Most fruits and vegetables can be frozen. I recommend cutting everything up into bite-size pieces and storing them in zip-top/Ziploc bags. I do this with vegetables that I can put into soups and stews or casseroles and fruits that could be incorporated into smoothies later. Making sure everything is cut up into bite-size pieces means that it will cook more uniformly, and smaller pieces of fruit blend a little easier. Spinach and some heartier leafy greens like kale can also be frozen!

Soups: As previously stated I freeze portions of each batch of soup I make so that we can have a quick easy meal later on down the road. Just make sure that it is cooled it to room temperature before you put it into the freezer. 

Casseroles: Did you accidentally make too many potatoes? It’s OK, just store them in a airtight freezer safe container, and you could have leftovers down the road. When you reheat it just defrosted it in the refrigerator and then heat like you normally would. 

Pizza: You can freeze leftover pizza. Not that that happens very often to my house, but I have been known to put pieces of pizza between parchment paper in a Ziploc bag and toss it in the freezer. 

Pizza dough: Speaking of pizza, you can also freeze pizza dough or bread dough. I tend to make a triple batch of pizza dough, and once it has had its first rise, I punch it down, knead it, and separate it into greased Ziploc bags. You can either butter the inside of the bag, or you can spray it with spray release.

Once you’re ready to make pizza, just take the pizza dough out of the freezer, leave it in the bag on the counter, and depending on the ambient temperature of your kitchen, in about 4 to 6 hours. The pizza dough will be at room temperature. You can give it one last knead before you roll it out and bake it.

Now that you know how to freeze all sorts of things, you too can keep your freezer well stocked and cut down on food waste.

May is National Salad Month!

May is National Salad Month and we are 100% here to celebrate.

Here are some of my family’s favorite salad recipes:

And if you are looking for an awesome salad bowl to take your creation to a potluck, this is my favorite bowl with a lid!

A few of my other salad must-haves are this lettuce knife, these salad tongs, and of course, this salad dressing bottle with recipes on the outside to help you stretch your creativity.

Family Recipe: Albondigas (Meatball Soup)

I learned to make this soup originally in High School Food and Nutrition class. The teacher was very big on low fat, low carb (it was the 90’s), so I’ve made a lot of changes from the original recipe to include more vegetables, aromatics, and herbs/spices.

Thankfully our  Yasukochi Family Farms CSA box loads us up weekly on locally grown, farm fresh veggies. All the veggies I used in this recipe came from our CSA box!

Ingredients:

  • 1 lb ground beef (I use 80/20)
  • 1/3 cup uncooked rice (don’t use instant rice. I used jasmine rice)
  • 1 egg
  • 1/4 c plain bread crumbs 
  • 1 T. Parsley
  • 1 T. Olive oil
  • 2 T. Minced garlic
  • 2 carrots peeled and chopped
  • 2 ribs of celery, chopped 
  • 1/2 yellow or white onion, diced
  • 1 potato, peeled and diced
  • 2 15-ish oz. cans diced, peeled tomatoes
  • 2 green zucchini or calabaza (Mexican Squash), cut into bite size pieces
  • 1 bay leaf
  • 2 T. Penzeys Penzeys Salsa & Pico Seasoning
  • 6 cups chicken or veggie stock
  • Salt and pepper to taste

Directions:

  1. In a mixing bowl, combine ground beef, rice, egg, breadcrumbs, and parsley. Form small meatballs, and set aside until all the meat is balled up. 
  2. In a large Dutch oven, heat oil and fry meatballs, turning frequently so all sides are browned.
  3. Remove meatballs, and set aside. Keep the drippings in the Dutch oven.
  4. In the Dutch oven, over medium heat, sauté carrots, onions, celery, and potatoes for about 10 minutes, until the onions are translucent. 
  5. Add in the garlic, continuing to cook over medium heat, until garlic is fragrant.
  6. After garlic is fragrant, turn heat down to low, add in remaining ingredients, including the meatballs that have been patiently waiting. Cover with a tight fitting lid, and allow to simmer for 15-30 minutes, giving time for the ingredients to mingle, and the meatballs will swell slightly, as the rice in them cooks. 


This recipes serves 6-8. It freezes well and is so good topped with a little queso fresco, fresh cilantro, a squeeze of lime and a little hot sauce. 

If you don’t eat beef, you can use any other ground meat. I’ve never used faux ground “beef”, so I can’t vouch for it. 

Recipe: Creamy Cajun Pasta

Last week, I was looking through the fridge, trying to figure out what to make with the chicken breasts that I had defrosted. None of the usual suspects sounded good, and then I remembered I has seen a video with a recipe for Cream Cajun pasta. I couldn’t find the video again, so I decided to wing it.

It’s super tasty, quick, and easy.

Creamy Cajun Pasta

Ingredients:

  • 2 T. AP Flour
  • 4 T. Cajun/Creole seasoning, divided
  • 2 large chicken breasts, slices in half (or 4 chicken breast tenders)
  • 2T. Olive or grapeseed oil, divided
  • 2T. butter, divided
  • 1 medium onion, chopped (I used a purple onion)
  • 2 bell peppers, chopped
  • 3 celery ribs, diced
  • 2 small zucchini or 1 large zucchini, cut into bite-sized pieces
  • 3 large tomatoes diced, or 1 can (about 15oz) diced tomatoes drained
  • 1 1/4 cups chicken stock
  • 1T. corn starch
  • 1/2 block cream cheese
  • 1 cup milk (I used whole milk if you want it extra thick and creamy use heavy cream)
  • 1/2 cup parmesan cheese
  • 1 lb. package of your choice of pasta, cooked per package instructions, reserve 1/4 cup cooked pasta water.

Directions:

  1. Mix flour and 2T of the Cajun seasoning in a shallow dish.
  2. Coat chicken breasts in flour/spice mixture.
  3. In a large skillet, heat half the butter and oil. Once the butter is melted, add chicken breasts. Cook for about 5-6 minutes on each side, allowing a light golden crust to form on each side of the breast.
  4. Once chicken breasts are golden brown on each side, remove from pan and set aside.
  5. Add remaining butter and oil.
  6. Saute onions, celery, and bell peppers in oil/butter until the onions are translucent, about 5-10 minutes.
  7. Add in the tomatoes and cook covered for about 5-10 minutes.
  8. While tomatoes are cooking mix stock and cornstarch to create a slurry. This mixture will thicken the sauce.
  9. Once the tomatoes have cooked and broken down, add the stock slurry, milk, and cream cheese. Stir and break down the cream cheese as it melts so there are no lumps. Add in the remaining Cajun Seasoning.
  10. Add back in the chicken breasts, and add in the zucchini, turn the heat down to low, and cook covered for about 5-10 minutes, or until the zucchini is tender.
  11. Mix in the remaining cheese, and taste. Add more Cajun Seasoning as desired. We added black pepper and red pepper flakes to taste (about 1 teaspoon each).
  12. Stir in reserved pasta water, and cooked pasta. Allow the entire dish to cook for about 3-5 minutes.

Serve topped with parmesan cheese if desired. This was an amazing dinner and it was done in less than an hour. I had prepped all the veggies ahead of time. I do about 2 hours worth of meal prep each week, including chopping veggies on Monday afternoons after the CSA box arrives.

Allergy variations:

  • To make this dish gluten-free, use Gluten Free AP flour, and gluten-free pasta.
  • To make this dish dairy free, use dairy-free milk, cream cheese, and parm.
  • This dish is not vegetarian or vegan. 


Give the Gift of the Farm with the Yasukochi Family Farms Black Friday Sale!

On Tuesday I posted about practical gifts for busy families. Little did I know that Yasukochi Family Farms was having a sale this weekend!

This is an amazing sale!

This sale is only good today, FRIDAY, 11/25, and ends on Sunday, 11/27! To learn more or order, check out their website.

One month of CSA Boxes your choice of regular box or Jumbo box. and 1 bottle of olive oil. I love this olive oil, it’s the best I’ve tried.

I get a Regular sized box each week, and it’s good for a family of 4 or smaller. A Jumbo-sized Box is perfect for larger families or for families that are vegetarians or vegans.


Back To School Sale from Yasukochi Family Farms CSA!

Two things I love: Fresh produce and deals! Thanks to  Yasukochi Family Farms we are able to get both through September 10th.

Now through 9/10/2022 you can score 4 Regular boxes for $108, or 4 Jumbo boxes for $152.

I get a Regular sized box each week, and it’s good for a family of 4 or smaller. A Jumbo-sized Box is perfect for larger families or for families that are vegetarians or vegans.

Here are pictures of a box we received earlier this year.

This is the type of variety that comes in the boxes each week! Each week the box is stuffed full with the freshest. in season fruits and veggies! And don’t forget there are add-ons too! Berries, local honey, olive oil, farm-fresh eggs, and more!

I’m partnering with Yasukochi Family Farms this month to bring you all of the best deals and freshest produce! I’ll be posting pics on my socials as well.


Recipe: Honey Balsamic Roasted Brussels Sprouts

This recipe is super easy. I used the Brussels Sprouts from my CSA box.

There is no need to use expensive balsamic vinegar or honey, whatever you have on hand is fine. BUT_ Make sure your honey is 100% honey and not honey flavored syrup.

Honey Balsamic Roasted Brussels Sprouts 

Ingredients

  • 2 pounds Brussel sprouts
  • Two bell peppers
  • 2 tablespoons avocado or olive oil (your choice)
  • Salt and pepper to taste
  • 1/4 cup balsamic vinegar
  • 1/4 cup honey

Directions

  1. To prepare the brussels sprouts for roasting, sliced each Brussel sprout in half and discard any loose outer leaves.
  2. Destem and deseed the bell peppers, dice or cut into long strips.
  3. Preheat oven to 450°. Place a foil-lined baking sheet into the cold oven and allow the pan to heat.
  4. In a mixing bowl combine brussels sprouts, bell peppers, salt and pepper, and oil. Toss veggies to coat in oil.
  5. Once the oven and baking sheet has come up to temperature, evenly spread veggies on the hot baking sheet and roast for 10 minutes, stir, and roast for up to an additional 10 minutes.
  6. While veggies are roasting, in a small pot combine honey and balsamic vinegar, cook on medium until the mixture reduces by half.
  7. Once veggies are cooked and removed from the oven toss in honey balsamic glaze. Serve immediately. If you desire, top with a little shaved Parmesan or pecorino.

Serves 4 to 6.

If there are any leftovers, they can be stored in the fridge for 3-4 days and reheated as you see fit.

Vegetarian Recipe Round Up

It’s time for some yummy veggie meals!

Most of these are vegetarian, not vegan. These are recipes that I feed my family, so they are kid-approved and don’t require any weird, expensive ingredients.

And as a bonus, many of the ingredients for these ingredients are frequently given out in Neighborhood Distributions.

Trying to Add Veggies to Your Meals?

Is one of your New Years Resolutions to eat better or increase your intake of fruits and veggies?

Since we have been getting CSA boxes from Yasukochi Family Farms we’ve been adding tons of fresh fruit and veg to our diet. It’s fun to get the kids involved in preparing and tasting new and different fruits and veggies.

I’ve made a round-up with some of my favorite fruit and veggie recipes to inspire you to add a little more “green” to your family’s meals!