Dinner Party Idea: DIY Ramen Potluck!

file5741236529320.jpg

We love to entertain. Dinner parties are a great way to have friends over to hang out and enjoy a good meal without breaking the budget.

We also love Ramen- not Top Ramen, but delicious, mouthwatering, tempting noodles, velvety broth, veggies, and soft boiled eggs. Doing a Ramen potluck is great way to try out new flavors that you may have never thought of.

In doing research for this article, I found out that there are so many ramen toppings and ingredients that I had never heard of (like corn, which you can see in the picture above). So some of the ingredients listed below may not make it into your potluck, but know that somewhere out there there is someone putting it on/in their ramen.

The host can provide the broth. As far as ramen broths, there are lots of options. I like Tonkatsu, which is pork and chicken based. Here is a great recipe.  Not interested in making it from scratch? You can buy Tonkatsu broth concentrate on Amazon.

If you are vegan, Ocean’s Halo makes a great seaweed based ramen broth. Miso is also a popular ramen soup base (Ocean’s Halo also makes great miso, pho, and veggie broth). We usually try to have two big pots of broth to choose from.

Screen Shot 2018-12-30 at 9.26.13 AM.pngAs far as noodles, you can get regular ramen noodles at any Asian grocery store (or most 99 Cents Only locations). I’m not talking about the kind that come in a little bag with a pouch of salty broth, those are fried so they cook super fast and aren’t really all that healthy.

I like the Organic Millet & Brown Rice Ramen from Lotus Foods. As a bonus these are gluten free and have protein in them. Our local Costco sells large packages, which is great for parties.

Some people like Soba noodles (thick buckwheat noodles), and some people like zoodles (the spiral cut zucchini “noodles”).

Now that you’ve got broth and noodles down, it’s time to get creative with toppings! Here are just a few ideas for guests to bring:

  • Eggs: I love a good soft-boiled egg on my ramen.
  • Scallions/green onions
  • Bean Sprouts
  • Seaweed/Nori sheets
  • Canned Bamboo shoots (they will need to be rinsed and probably sliced to made bite-sized.
  • Corn Kernels (defrosted frozen, fresh, or canned with no salt- drained and rinsed).
  • Mayu/Black Garlic Oil
  • Soy Sauce
  • Chili Sauce
  • Rice Vinegar
  • Pickled Ginger
  • Fish Sauce
  • Kimchi
  • Fried Tofu
  • Sesame Seeds
  • Sliced fresh Jalapeños
  • Fried or pan steamed Gyoza
  • Roasted /braised slices of pork (fattier cuts of pork are great in ramen)
  • Cooked Shrimp (I can’t really give you any other suggestions on cooking/serving, I’m allergic to shellfish)
  • Fish Cakes (available at your local Asian Market)
  • Bok Choy
  • Mushrooms (Sliced shiitakes are nice, as are enoki)

And some people like rice as a side to their ramen. I prefer sticky rice, it’s easier to eat with chopsticks.

If you’ve got friends that don’t cook, don’t forget you’ll need chopsticks, bowls, spoons, and beverages.

Talk Back: What is your favorite type of Ramen? 

My New Favorite Cooking Oil: Malaysian Palm Oil!

Screen Shot 2018-12-15 at 10.41.45 PM.pngAt The Moms Meet Wow Summit last month, I was introduced to Malaysian Palm Oil. As someone who cooks daily, I’m always looking for new, healthy ingredients to incorporate into the family diet.

I’d never tried palm oil before, nor had I heard of it, so here are some cool things I learned:

  • Palm oil comes from the fruit of a special species of palm tree grown near the equator. Oil palm plantations are incredibly high yielding and also provide an environment where native animals can thrive. You can learn more here.
  • Palm oil comes from the palm oil fruit, not the tree itself, so there is no deforestation. Also each tree produces fruit all year long for up to 25 years! In Malaysia, palm oil is only produced on legal agricultural land in compliance with Good Agricultural Processes. Fifty percent of Malaysia’s land area is mandated forest cover.
  • It’s better for cooking as it is stable at higher cooking temperatures, is free of trans-fatty acids, rich in vitamin E tocotrienols, and red palm oil is also an abundant source of pro-vitamin A carotenoids.  Red Palm oil has more carotene than carrots and tomatoes.
  • I recently used the Malaysian Palm oil in place of Olive Oil when making Pizza Crust last weekend. It didn’t change the crust at all texture-wise, but it did give it more or a golden appearance and a more buttery flavor.
  • Overall, Malaysian Palm oil have a very velvety, butter mouth feel and taste.
  • I like that Malaysian Palm oil is a Non-GMO. More than 90% of other cooking oils (soy, corn, rapeseed/canola) is made from crops grown with genetically modified seeds,
  • Malaysian Palm oil is a natural substitute for partially hydrogenated oils (the trans fats). That’s great news for me, since I cook a lot of scratch!

Screen Shot 2018-12-15 at 9.30.53 PM.png
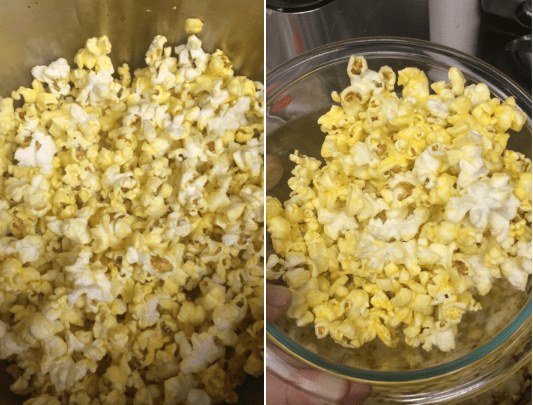
I wanted to showcase the oils natural buttery taste and feel, so I whipped up some popcorn on the stove top, the old-fashioned way.

Screen Shot 2018-12-15 at 9.31.27 PM.pngAll you need is:

  • 3 T. Malaysian Palm Oil
  • 1/2 C. popcorn kernels
  • Whatever seasoning you like (I like salt and pepper)

Directions:

  1. In a large pot (6+ quarts, I have this one), heat the oil and add 3 kernels. Cover with the lid,
  2. Cook on medium-high heat until kernels pop. Remove the pot from the heat, scoop out popped kernels, and add in the rest of the unpopped popcorn kernels.
  3. Cover with the lid, and give the pot a good shake (use potholders!). Let sit off heat for 30 seconds to 3 minutes.
  4. Put pot back on the heat (medium-high), set the lid slightly askew, so the steam may escape. Shake the pot a few more times. Once the popping starts, it pops quickly.
  5. Once the popping has slowed, remove from the heat and pour the popcorn into a bowl and top with desired seasonings, butter, etc.

A big thanks to the Malaysian Palm Oil Council for the bottle of Palm Oil and Popcorn to try out this recipe. All opinions are my own and I was not compensated.

I can’t wait to substitute Palm Oil into my favorite recipes!


Recipe: Kitchen Sink Chip Cookies

IMG_2799
Yeah, I have on a cute apron too!

It’s finally winter in San Diego! It’s rainy, cool, and we even had an awesome thunderstorm this afternoon. Cooler weather means that I can turn on the oven and get cooking!


IMG_2798
That’s a lot of cookie dough!

I made these cookies for the first time last weekend for a Cast Party. They were so well-received (read, I think only 3 came home, out of the 3 dozen I made) that I knew I had to make them again.

So why Kitchen Sink Chip? You can use whatever kind of chips or candy you’ve got. Everything but the Kitchen Sink. The first time I used peanut butter chips, butterscotch chips, and M&M’s.  This time, I used butterscotch chips, semi-sweet chocolate chips, and M&M’s to accommodate a friends peanut allergy. Additionally, you could use white chocolate chips, dark chocolate chips, milk chocolate, speciality holiday chips, M&M’s (of any variety), or any yummy candy- I got Andes Mints pieces to put in my next batch. Whatever sounds good to you.


Ingredients:

  • 4C. AP Flour
  • 2t. Baking Soda
  • 1t. Salt (I use pink salt)
  • 4 eggs
  • 2C. softened butter or shortening or coconut oil (or some combination of two or more- I use half butter and half shortening)
  • 1C. white sugar
  • 1C. brown sugar, packed
  • 2T. Vanilla
  • 1.5C Chocolate Chips (or whatever kind you like)
  • 1.5C. Butterscotch Chips (or whatever kind you like)
  • 3 oz box M&M’s- movie theatre sized box (or whatever kind of candy you like)

Directions:

  1. In a medium bowl combine flour, soda, and salt. Set aside.
  2. In a large mixing bowl, cream butter and sugars.
  3. Add eggs, one at a time.
  4. Add vanilla.
  5. Using mixer on low, slowly add dry mixture to wet mixture.
  6. Once two mixtures are completely combined, add chips/candy one variety at a time and mix well.
  7. Drop spoonfuls of dough on greased cookie sheets or cookie sheets lined with silicone baking pads.
  8. Cook in a 350 degree oven. You can adjust the size and baking time, depending on the size cookie you want. I used rounded tablespoons and it took about 12-15 minutes in a 350 degree oven.  If you make them smaller, adjust cooking down to 8-10 minutes.

Tablespoons: 2 dozen large cookies

Teaspoons: 4 dozen smaller cookies.

These cookies are dead simple to make. You can make adjustments as needed: 1 for 1 gluten free flour for AP flour, Sola or Splenda for white sugar. I like that these cookies are not overly sweet. They use approximately 1/2 cup less white and brown sugar than other cookie recipes. I think that and the salt help the flavors of the chips/candy pop.


Recipe: Easy Cheesy Enchiladas

IMG_2712.jpg
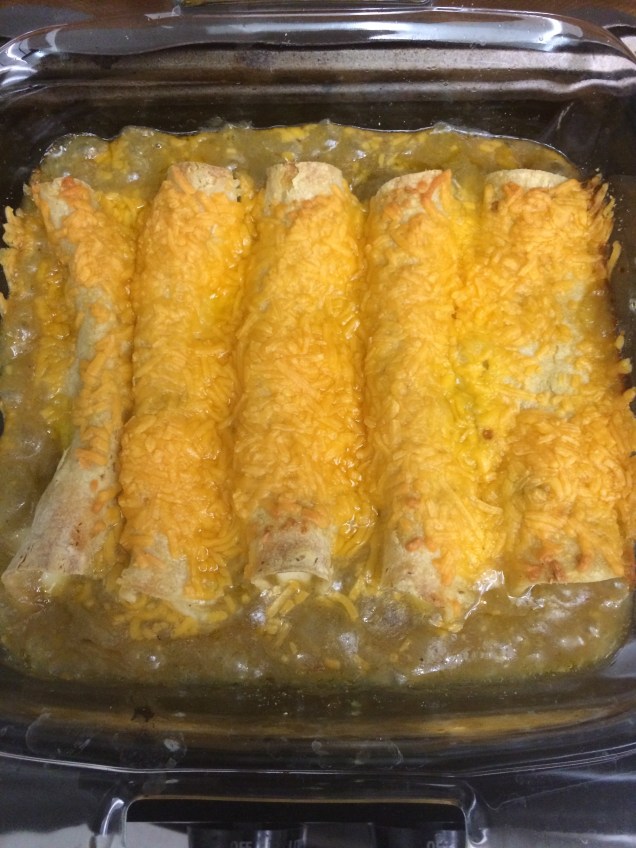
I love enchiladas. I seldom get them when we get Mexican take-away because they aren’t baked, so the cheese isn’t melty. And really, life is primarily about melty, gooey cheese.

The other night, I had a hankering for melty cheese, so I rifled through the cupboard and discovered that we had all the fixins’ for cheese enchiladas. I added caramelized onions, because… why not?

This recipe is easy to make, vegetarian, gluten-free,  and can be made vegan if you use dairy-free cheese.

Ingredients:

  • 1 medium white onion, chopped
  • 1T. butter or olive oil
  • 12 corn tortillas
  • 1 can enchilada sauce, approx 24 -26 oz (I prefer green) Las Palmas is my favorite brand
  • 12 pepper jack cheese sticks
  • 1/2 c. shredded cheese (I used cheddar, but Mexican cheese blend works great)

Directions:

  1. In a pan, cook onion in butter/oil on medium low for 10-15 minutes, stirring frequently.once onions are golden brown, remove from heat and set aside.
  2. Once onions are cool, add to enchilada sauce. Pour 1/2 of sauce into the bottom of a baking dish. Sprinkle with 1/2 of shredded cheese.
  3. Place 1 cheese stick at the edge of a corn tortilla and roll the tortilla around the cheese. Place in the baking dish, flap side down.
  4. Continue until the baking dish is full.   I do one layer, but depending on how many people you need to fee, you might do two layers.
  5. Pour remaining sauce on top of enchiladas, top with remaining shredded cheese.
  6. Bake at 350 for 20-30 minutes, until cheese is bubbly and edges of tortillas are crisp.


I serve with beans, rice, and Mexican Cesar salad. They make great leftovers too- not that it will last.


Recipe: Stuffed Squash

IMG_2640.jpg
This is a very hearty dish! Perfect for cold winter nights!

On Sunday, we made dinner for a friend. She’s a vegetarian, and we wanted to make something hearty, filling and nutritious. After searching for a few stuffed squash recipes, and hitting up the grocery store, I picked up a butternut squash. Originally I wanted a acorn squash, but most of the stores were wiped out from Thanksgiving.

IMG_2635.jpg
Fruits and veggies cooking in stock. Juicy Gems add a nice tart aspect to the dish.
IMG_2636.jpg
The Chopped Squash “guts”

We chose ingredients that were healthy and worked well together. This recipe is naturally vegan and Gluten free. There is an option to top the squash with poached eggs, if you want a little more protein.

This recipe is a little more work than my usual fare, but it’s really tasty and makes A LOT.  To save time I used one of the bags of Mirepoix (pronounced meer pwah)I had prepped and froze last week. If you don’t do prep cooking, check your local grocery store freezer case for frozen mirepoix.

I get all of my spices from Penzey’s. They have 67 stores across the country, and you can order from their website too. They frequently have coupon codes for free samples or shipping when you place an order- It’s worth a google search!

You can serve this as a main dish or a side.

Stuffed Squash

Ingredients:

  • 1 large butternut squash
  • 1 T. Olive Oil
  • 2 cups vegetable broth
  • 2 T. Butter
  • 2 small Granny Smith Apples, cored and chopped
  • 1 cup carrots, diced
  • 1 cup celery, diced
  • 2 cups onion, diced (I used a sweet onion)
  • 1 can garbanzo beans, drained and rinsed (15 ounce can approx.)
  • 1 ounce pouch of Juicy Gems dried pomegranate arils
  • Salt
  • Pepper
  • 1 tsp. French Tarragon
  • 1 tsp. Rubbed Sage
  • 1 tsp. French Thyme
  • 1 Bay Leaf
  • 1 T. Air Dried Shallots

Screen Shot 2018-11-27 at 10.51.56 AM.pngScreen Shot 2018-11-27 at 10.51.50 AM.png


Directions:

  1. Cut Squash in half, remove seeds/membrane. Brush with oil, salt and pepper.
  2. Bake at 425 for 30-45 minutes, until squash is fork tender.
  3. While squash is cooking, In a large pan, melt butter, and saute fruit, veggies, and spices/herbs. Cook over low heat for about 20-30 minutes. Add garbanzo beans, arils, and broth. Cook for another 20-30 minutes or so, or until broth is mostly absorbed and garbanzos are tender.
  4. As the stuffing cooks, once the squash is cool enough to handle, scoop out about 1/3 of the squash. You want to create a cavity for the stuffing. Set the “guts”  aside- You can chop it up and add it to the stuffing, or serve it on the side (I just ate it with butter while the stuffed squash cooked).
  5. Place the squash halves on a baking sheet, and fill the cavities with the veggie stuffing. Top with more salt and pepper, as needed.
  6. Bake at 350 for 20-30 minutes. Serves 4 as a main dish, 6-8 as a side dish. For added protein when served as a main dish, top each portion with a poached egg. Not sure how to poach an egg? Alton Brown has a great tutorial here. 


Talk Back: What is your go-to Vegetarian dish? 

IMG_2639.jpg

Review: Hen in a Hurry

In October, I was offered a sample meal box from Hen in a Hurry. It arrived towards the end of the month, and I was stoked. We’ve been making our way through the meals. 

Hen in a Hurry is an awesome new frozen family meal Delivery service. Hen in a Hurry was created in the small kitchen of the popular Greensboro, North Carolina eatery, Iron Hen Cafe. By customer request, the idea of Hen in a Hurry came to be. They love organic and locally grown, but make exceptions for some farmers and producers. Meals are precooked and flash frozen so all you have to do is heat it up. All subscriptions are no commitment – pause or cancel at whenever you want!

We Received 4 meals to try out: 

-Chicken Fettuccini Alfredo with Fire Roasted Vegetables
-Pesto Zucchini Noodles with Fire Roasted Vegetables
-Philly Cheesesteak Stuffed Pepper with Loaded Cauliflower
-Fresh Garlic and Turkey Meatloaf with Grilled Green Beans

The meals arrived frozen in a large styrofoam box. They were packed with dry ice, and when they arrived, most of the dry ice had evaporated, but the food was frozen like a rock!

We had the Philly Cheesesteak Stuffed Pepper with Loaded Cauliflower first. The directions give you the option to cook them in the microwave or the oven. I microwaved the peppers, which was a mistake. All of the cheese melted and turned into a puddle of fat in the bottom of the tray.  No problem! I put the peppers into a baking dish and sprinkled some Italian cheese blend on the top and put them under the broiler for 3 minutes. Dinner was saved.  The only thing that was missing was there were no onions in ours, so I had to grill some up separately and add them to the top before serving. 

And I’ve got a coupon code and deal to share with you!  You can chose which plan works best for your family. And this makes a great gift!

  • (30) Individual Meals – Subscription for a month – Regular Price: $315.00 – Deal: 45% off ($141.75 off) 1st months subscription Use Code: 45offFamilyGuide             
  •  (7) Individual Meals – Subscription for a week – Regular Price: $99.00 – Deal: $40 Off 1st week’s subscription Use Code: 40offFamilyGuide
  • (4) 4 days a week- Family Meals – Includes a side and entree for a family of 4 (16 total meals) – Regular Price $96 – Deal: $25 Off 1st week’s subscription Use Code: 25offFamilyGuide
  • (6) 6 days a week – Family Meals – Includes a side and entree for a family of 4 (24 total meals) – Regular Price $132 – Deal: $35 Off 1st week’s subscription Use Code: 35offFamilyGuide

To get started:

Visit Hen in a Hurry and pick one of the advertised subscriptions. During checkout set up your account and then enter in the promo code associated with the deal you choose. Easy peasy!

USE CODE “SHIP4FREE” TO GET FREE SHIPPING ON ORDERS OVER $100.

And remember, all subscriptions are no commitment – pause or cancel any time. Orders placed by 12 Noon EST on Thursday will be shipped the following Monday afternoon.

I received these meals in order to facilitate this review, I received no financial compensation and all honest opinions are my own. Thanks to US Family Guide and Hen in a Hurry for this opportunity.

Recipe: Peanut Butter Krispie Treats

DSCN9789.jpgThis is of of those family recipes that I think everyone has had, but never realized was so dead simple to make.

My mom made these a lot when I was a kid. They are peanut buttery, butterscotch-y, and so rich an tempting, I’m making a batch tomorrow.

This recipe can me made Gluten free by using gluten free Krispie Rice Cereal, but it cannot be made vegan- you need both marshmallows and butter.

Ingredients:

  • 1/2 c. Butterscotch chips
  • 1/2c. Peanut Butter chips
  • 3 Tablespoons Butter
  • 40 marshmallows
  • 6 cups Krispie Rice Cereal (in the past I’ve also used the Fiber One Original Bran instead- They come out a little heavier, but are good)
  • Spray Release
  • 1/4-1/2 c. extra chips, optional


Directions:

  1. Spray both a 13×9 pan and a rubber spatula with spray release, set aside.
  2. In a large pot, melt the chips and butter over low heat.
  3. Add marshmallows and stir constantly until melted. Remove from heat.
  4. Add cereal and stir until cereal is completely coated.
  5. Using previously sprayed spatula, evenly pour and press cereal mixture into greased pan.
  6. If desired, while still hot, sprinkle with 1/4-1/2 cup of chocolate or peanut butter chips, as the chips melt, spread with greased spatula to cover the bars.
  7. Once cooled, cut into squares. They last 3-4 days in the fridge, but, really, they’ll be gone in a flash.

Talk Back: I’d love to hear about your favorite cookies/sweets from childhood!

Meal Plan Monday 11/5/18

stemarie_1650skitchen

I’m back home from Wow Summit, and I had 4 bags full of goodies- most of it was food- no lie! So this week is going to be incorporating a lot of the new foods into our lives and seeing how we like them.

Breakfasts are usually the same for us: Protein shakes for grown ups, and pancakes or something along those lines for the kids. We have plenty of protein shake fixins’- I buy the over ripe bananas, peel and slice them pop them into ziploc bags, and freeze them for smoothies and protein shakes. I also keep sandwich ziploc bags of  other frozen fruit on hand to make the kids smoothies when they request them (a few times per week). Berries, peaches, and mangos are pretty popular.

Lunches are leftovers, salads, or a protein shake for the grown ups, and The Big Kid has a specially packed lunch of whatever he’s into at the time (which changes frequently). Bitty Bird eats whatever I’ll feed her.

For dinner, when we’ve got busy days (like Mondays), I’ll try and put something in the crockpot in the morning, or pull something I’ve already prepped out that can be quickly cooked.

Monday: DIY Ramen Night with ramen kits I got from Wow Summit. One is Forbidden Rice Ramen, and the other is Red Miso Ramen. We’ll add poached eggs, bean sprouts, scallions and Asian veggie patties from Aldi’s. I love DIY Ramen nights- it’s a great way to have a yummy, filling vegetarian (or even Vegan) meal. I’ll be writing more about how you can do your own DIY Ramen bar at a dinner party soon.

Tuesday: Grilled Cheese sandwiches and soup, watermelon slices

Wednesday: breakfast for dinner! probably egg scrambles with bacon, veggies, cheese, and whole wheat toast (or whatever bread I have in the freezer)

Thursday: Fruit salad bar (I have a lot of fruit right now- it’s time to make a huge fruit salad), yogurt or cottage cheese, and granola.

Friday: Steak. I really want a steak right now, so I’m planning on pan seared steak with caramelized onions, and a red wine pan demiglace. Roasted veggies, twice baked potatoes, green salad, and popovers. This is a super simple, inexpensive dinner- Less than $20 for a steak dinner for three (Big kid doesn’t eat meat).  I will write about making a rocking steak dinner on the cheap soon.

Saturday: DIY Pizza night

Sunday: Leftovers


Talk Back: What are you craving for dinner this week?

Versatile Chicken Meatball Recipe!

file0001211860395.jpg

This recipe is dead simple! We don’t eat a lot of red meat, and I’m not a huge fan of ground turkey, so I was hoping to find some way to concoct an awesome meatball recipe.

After some trial and error (ok- it was one batch that was weird and dry), and tastings with various sauces, and here is the final tasty result!

Ingredients:

  • 1 lb ground chicken (I use Foster Farms)
  • 1 egg
  • 1/2 small onion diced small
  • 1 clove garlic, chopped small
  • 1 1/4 cup panko breadcrumbs
  • 1/2 teaspoon each salt and pepper
  • 1 T. dried parsley
  • 2 T. olive oil

Directions:

  1. In a large mixing bowl, mix all of the ingredients, except the olive oil.
  2. Once all of the ingredients are combines, shape the meat mixture into small balls. Place small balls on a plate or cookie sheet and place in the fridge or freezer for 20 minutes, until firm.
  3. Once firm, fry in olive oil in batches until cooked through.
  4. Meatballs can be topped with a favorite sauce and served right away, or store in the freezer in an airtight container for up to a month.

This recipe makes between 12-20 meatballs depending on how big (or small) you make the meatballs.

These meatballs are great with BBQ sauce, spaghetti sauce, even as Swedish meatballs!

Weekly Meal Plan!

stemarie_1650skitchen

I spent a bunch of time late last week cleaning out the pantry, fridge, and freezer and worked up a list of meals that we can have over the next ten days.

Breakfasts are usually the same for us: Protein shakes for grown ups, and pancakes or something along those lines for the kids. We have plenty of protein shake fixins’- I buy the over ripe bananas, peel and slice them pop them into ziploc bags, and freeze them for smoothies and protein shakes. I also keep sandwich ziploc bags of  other frozen fruit on hand to make the kids smoothies when they request them (a few times per week). Berries, peaches, and mangos are pretty popular.

Lunches are leftovers, salads, or a protein shake for me and the Mister, and The Big Kid has a specially packed lunch of whatever he’s into at the time (which changes frequently). Bitty Bird eats whatever I’ll feed her.

For dinner, when we’ve got busy days (like Mondays), I’ll try and put something in the crockpot in the morning, or pull something I’ve already prepped out that can be quickly cooked.

Monday: Bean, Rice, and Cheese bowls, watermelon slices

Tuesday:Chicken meatballs (I’ll post my recipe later this week-it’s super simple) with BBQ sauce, herbed cauliflower rice, green salad

Wednesday: Stuffed Peppers, roasted brocolli, popovers (with lots of butter)

Thursday: Homemade Ramen (complete with veggies and poached eggs)

Friday: Veggie Burgers, fruit salad, butternut squash

Saturday: DIY Pizza night

Sunday: Leftovers