In my recent post about hosting a mermaid-themed party, I mentioned that we will be serving pasta salad.
One of the things that I love about pasta salad is that it’s so flexible.
Basically, all you need is a pound of pasta (your choice) cooked per package directions, drained, and rinsed. After that, whatever you add is up to you.
I use 1 cup of dressing to start. Usually, I use zesty Italian-type dressing, but if you are a pesto lover, 1 jar/can of pesto and a few tablespoons of your favorite oil (I like avocado oil) is excellent. Red or green pesto, whatever your preference is. If you are serving vegetarians, avoid red pesto because it contains anchovies.
1 cup of diced cheese- Mozzarella, or mozzarella pearls, or cut up a couple string cheese sticks.
2 cups vegetables, cut into bite-size pieces. Bell peppers, broccoli, black olives, tomatoes (either grape or cherry), and fresh, shelled peas are some of my favorites.
Optional, but tasty: a bunch of fresh basil, cut into ribbons (chiffonade).
Mix all ingredients together, and store in a tightly closed container for at least 4-6 hours prior to serving.
This recipe serves about 8-10 as a side dish, less as a main dish. If you need to add meat to this, as a can or 2 pouches of chunk tuna, drained and rinsed.
There are literally hundreds of ways to make Potato Salad. However, none of them should involve raisins (That’s an internet thing, I’ve never actually seen it in person).
This is my great grandmother Tootie’s Potato Salad Recipe, and I think it’s the best. Luckily for me, we’ve gotten all of the veggie ingredients in this week’s Yasukochi Family Farms CSA box. And because they sell eggs too as an add-on, you can get most everything you need without leaving home.
This recipe is pretty simple.
Tootie’s Potato Salad
Ingredients
4 cups peeled, cut-up potatoes (bite-size pieces)
3 ribs of green celery, cut into bite-size pieces- I slice each rib in half and into small pieces.
Boil potatoes in water until they are fork tender, about 15-20 minutes.
Drain potatoes, do not rinse.
Chill potatoes in the fridge (30 minutes to 1 hour-ish).
In a bowl, combine the salad dressing and mayo, pour over cooled potatoes, and stir. You want to coat the potatoes in the mixture.
Add in the celery and eggs. The egg yolks will break down and combine with the dressing/mayo mixture, turning light to medium yellow.
Chill in the fridge at least overnight. If the salad is too dry, add a few more tablespoons of mayo and dressing (a 2-parts mayo to 1-part dressing mixture).
Taste and add salt and pepper as needed.
Prior to serving top with chives or parsley if desired.
If you like green onions (my mom doesn’t like raw onions so she doesn’t add them), you can add 1-2 sliced green onions to the salad during step 5. I grew up without it, but they are really good in this salad.
This salad is good in the fridge for up to a week and is perfect for the 4th of July or other summer celebrations.
Dietary options: It’s already vegetarian, but I’m not sure it could be made vegan unless you use veganaise and omit the eggs (in my opinion it needs).
This is a super easy recipe that my mom has been making for 25+ years. She got the idea from a recipe in a cooking magazine that started with a bag of frozen veggies that was thawed.
She subbed out the frozen veggies for fresh ones, added some cubed cheese, and tortellini salad became a family hit! It is great for picnics, potlucks, and family parties. It’s a staple at our July 4th party!
Tortellini Salad
Ingredients:
1 package cheese tortellini, cooked per package directions, drained, and rinsed.
1 cup of your favorite Italian Salad Dressing
1 cup cubed mozzarella cheese
1 red bell pepper, chopped into bite-size pieces
1 yellow bell pepper, chopped into bite-size pieces
1 green bell pepper, chopped into bite-size pieces
1 jar marinated artichoke hearts, drained. and chopped into bite-size pieces
1 small package pepperoni (or salami- your choiceof), cut into bite-size pieces
1 small can sliced black olives, drained
Directions:
In a large bowl combine the cooked and cooled tortellini, cheese, veggies, meat, and salad dressing.
Store in the fridge covered for at least overnight before serving it. Add additional dressing as needed (sometimes the tortellini soaks up a little bit of dressing).
As a side dish, it serves 6-8, and as a main dish 3-4.
Substitutions:
If you are vegan, sub out vegan tortellini and vegan cheese.
If you are Gluten Free, sub out GF tortellini.
If you like tomatoes, it’s also great with about 1 cup of cherry/grape tomatoes (I slice them in half).
I know, KALE. It’s weird and has that super crunchy stem. It’s really good for you, but it gets a bad rap.
This salad recipe is dead simple and is so good that you will fight over the leftovers (if there are any).
I like making this in the morning and letting it sit in the fridge all day. That gives the ACV in the dressing time to mellow out and all the flavors to mingle.
I like starting with a bag of triple-washed chopped kale, since it’s usually the same price as whole kale, and it saves me time, but you do what works best for your family and budget.
Ingredients:
1 package triple-washed chopped kale, or 6 cups of kale, washed and chopped into bite sized pieces.
1/4 cup Apple Cide Vinegar, with the mother (I like Bragg’s)
1/4 cup of your favorite oil, we prefer avocado oil (like this one)
1 t. honey or agave
dash kosher salt
a few grinds of black pepper
1 T. fresh, chopped rosemary, or 2 t. dried rosemary (whichever you have)
1/2 c. crumbled herbed feta or goat cheese (your choice)
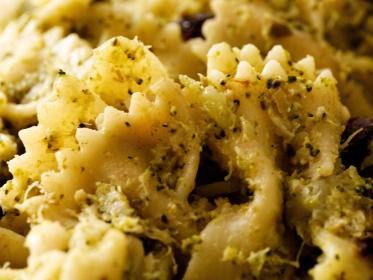
I was talking about this really amazing dish with my mom the other day, and I realized that I had not posted the recipe!
I can’t find the original recipe for this, but I was driving around the week before Independence Day, and I was listening to NPR when this recipe was discussed.
I made this tart for our 4th of July celebration, and it was gone almost instantly! I didn’t even get a photo of it after it came out of the oven.
This recipe is great with veggies fresh from the garden!
Oh man was it good! It’s easy to make, and you can substitute any veggies that you have in your kitchen (or garden).
I’ve been meaning to post this recipe for a couple weeks, but with summer vacation and the kids needing to see me, talk to me, touch me every.moment.of.the.day….. I’ve been a little behind.
This is so easy, so tasty, and so cheesy. And it works with almost every dietary restriction:
If you are vegetarian but omit the chicken.
If you are Gluten-free, substitute GF pasta for what’s the recipe.
If you are vegan, use your favorite vegan “cheese”. And remember to check the pesto- sometimes commercially made pesto contains cheese!
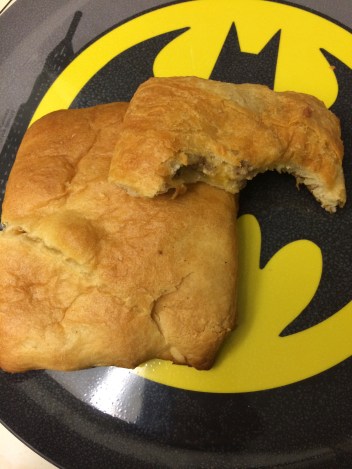
I haven’t done a family recipe in a while. My mom made a batch of these recently and sent me home with a few.
na na na na na na na na na- Bat Plate!
Turnovers, hand pies, pasties, kolaches, whatever you call them, I love them. Eating with your hands is done in almost every other culture on earth, but us westerners tend to frown on it.
My mom invented these rich, savory turnovers based on the flavors that I loved as a kid (and still love). It’s a pastry or yeast dough exterior, filled with cheese, chicken, breakfast sausage, and green chilis.
The batch she made last week used crescent dough that was rolled out. You may be able to see the remaining perforation in one of the photos.
In the past, I’ve used my pizza crust recipe (found here). It’s really up to you what kind of dough you use for exterior. Crescent dough is rich and buttery, and I think it works well for this recipe, so it’s what I’m going with. You can get the crescent dough in one large sheet if you want and cut it up, or, we used the regular rolls, and just did 2 crescents per hand pie.
Abasitas
(Makes 16-20 depending on type of dough used)
Ingredients:
2 chicken breasts, cooked and chopped up (You can also use 1.5 cups of chopped up rotisserie chicken meat)
1/2 lb of Jimmy Dean Breakfast Sausage, cooked, crumbled, and drained of fat
1 batch pizza dough (recipe linked above), or 4 tubes crescent roll dough
Directions:
Pre-heat oven to 350 degrees
Mix first five ingredients together in a medium mixing bowl.
Roll out/unroll dough; Separate into 4 rectangles. Pinch together perforations to seal up. If you are using another type of dough, roll out on a floured surface and use a sharp knife to cut the dough into approx. 8×5 rectangles.
Place approx. 1/4c of filling in the middle of each piece of dough. Fold over, and seal edges of the dough by pinching edges together, you can also crimp the edges with a fork.
Bake on an ungreased cookie sheet (I always use parchment paper– it makes clean up easier) for approx 12-15 minutes until the dough is golden brown.
Remove cookie sheets from the oven and allow hand pies to rest for 2-3 minutes before transferring to a cooling rack. Allow to rest a few more minutes before devouring.
Yummy cheesy filling!
I serve these with a green salad. They are good cold the next day too. They make a great picnic addition.
After they have cooled completely, store them in the fridge or the freezer. You can reheat them in the toaster oven!
It’s finally winter in San Diego! It’s rainy, cool, and we even had an awesome thunderstorm this afternoon. Cooler weather means that I can turn on the oven and get cooking!
That’s a lot of cookie dough!
I made these cookies for the first time last weekend for a Cast Party. They were so well-received (read, I think only 3 came home, out of the 3 dozen I made) that I knew I had to make them again.
So why Kitchen Sink Chip? You can use whatever kind of chips or candy you’ve got. Everything but the Kitchen Sink. The first time I used peanut butter chips, butterscotch chips, and M&M’s. This time, I used butterscotch chips, semi-sweet chocolate chips, and M&M’s to accommodate a friends peanut allergy. Additionally, you could use white chocolate chips, dark chocolate chips, milk chocolate, speciality holiday chips, M&M’s (of any variety), or any yummy candy- I got Andes Mints pieces to put in my next batch. Whatever sounds good to you.
Ingredients:
4C. AP Flour
2t. Baking Soda
1t. Salt (I use pink salt)
4 eggs
2C. softened butter or shortening or coconut oil (or some combination of two or more- I use half butter and half shortening)
1C. white sugar
1C. brown sugar, packed
2T. Vanilla
1.5C Chocolate Chips (or whatever kind you like)
1.5C. Butterscotch Chips (or whatever kind you like)
3 oz box M&M’s- movie theatre sized box (or whatever kind of candy you like)
Directions:
In a medium bowl combine flour, soda, and salt. Set aside.
In a large mixing bowl, cream butter and sugars.
Add eggs, one at a time.
Add vanilla.
Using mixer on low, slowly add dry mixture to wet mixture.
Once two mixtures are completely combined, add chips/candy one variety at a time and mix well.
Drop spoonfuls of dough on greased cookie sheets or cookie sheets lined with silicone baking pads.
Cook in a 350 degree oven. You can adjust the size and baking time, depending on the size cookie you want. I used rounded tablespoons and it took about 12-15 minutes in a 350 degree oven. If you make them smaller, adjust cooking down to 8-10 minutes.
Tablespoons: 2 dozen large cookies
Teaspoons: 4 dozen smaller cookies.
These cookies are dead simple to make. You can make adjustments as needed: 1 for 1 gluten free flour for AP flour, Sola or Splenda for white sugar. I like that these cookies are not overly sweet. They use approximately 1/2 cup less white and brown sugar than other cookie recipes. I think that and the salt help the flavors of the chips/candy pop.
This salad is a favorite at our house. Because of it’s simplicity, it’s great to take to potlucks too! It would be a great addition to any holiday feast table. It’s Vegan, Gluten Free, Low Carb, Paleo compatible! No excuses- Give it a shot!
Mix the vinegar, oil, and spices in a small bowl, set aside.
Place the veggies in a large bowl.
Slowly drizzle the dressing mixture over the veggies and toss lightly to coat. Cover bowl (I use a bowl like this one) and store in the fridge for 4-12 hours before serving- this allows the flavors to mingle. The salad can be stored for up to 4 days.
Sliced fresh mushrooms are also great additions to the salad, as are drained, rinsed canned artichoke hearts. If you aren’t concerned about it being vegan, adding 1/2 cup of cubed Monterey Jack cheese is tasty too!
 In my recent post about hosting a mermaid-themed party, I mentioned that we will be serving pasta salad.
 There are literally hundreds of ways to make Potato Salad. However, none of them should involve raisins (That’s an internet thing, I’ve never actually seen it in person).
 This is a super easy recipe that my mom has been making for 25+ years. She got the idea from a recipe in a cooking magazine that started with a bag of frozen veggies that was thawed.
 I know, KALE. It’s weird and has that super crunchy stem. It’s really good for you, but it gets a bad rap.
 I was talking about this really amazing dish with my mom the other day, and I realized that I had not posted the recipe!


 This salad is a favorite at our house. Because of it’s simplicity, it’s great to take to potlucks too! It would be a great addition to any holiday feast table. It’s Vegan, Gluten Free, Low Carb, Paleo compatible! No excuses- Give it a shot!