I spent a bunch of time late last week cleaning out the pantry, fridge, and freezer and worked up a list of meals that we can have over the next ten days.
Breakfasts are usually the same for us: Protein shakes for grown ups, and pancakes or something along those lines for the kids. We have plenty of protein shake fixins’- I buy the over ripe bananas, peel and slice them pop them into ziploc bags, and freeze them for smoothies and protein shakes. I also keep sandwich ziploc bags of other frozen fruit on hand to make the kids smoothies when they request them (a few times per week). Berries, peaches, and mangos are pretty popular.
Lunches are leftovers, salads, or a protein shake for me and the Mister, and The Big Kid has a specially packed lunch of whatever he’s into at the time (which changes frequently). Bitty Bird eats whatever I’ll feed her.
For dinner, when we’ve got busy days (like Mondays), I’ll try and put something in the crockpot in the morning, or pull something I’ve already prepped out that can be quickly cooked.
Monday: Bean, Rice, and Cheese bowls, watermelon slices
Tuesday:Chicken meatballs (I’ll post my recipe later this week-it’s super simple) with BBQ sauce, herbed cauliflower rice, green salad
Wednesday: Stuffed Peppers, roasted brocolli, popovers (with lots of butter)
Thursday: Homemade Ramen (complete with veggies and poached eggs)
Friday: Veggie Burgers, fruit salad, butternut squash
Ok, so I’ve discussed Meal Planning here, and I try to post our weekly meal plans on Mondays, but I’m sure you’ve wondered if/how I actually do it.
One of my secrets is that I try and do meal prep and batch cooking once every few weeks. For us that means:
Setting aside an hour or so after grocery shopping to clean the produce, and prep it in single serving containers (they are reusable, don’t worry) if they are for lunches or snacks. Little bags of carrots, or grapes are both popular in our house.
I make my own smoothie kits too- cut up over ripe bananas and other fruits and put them into single servings ziploc bags.
Make frozen veggie bags too: I cut up onions, carrots, and celery for mire poix bags. They are the perfect base for most dishes, especially soups. I also cut up fresh brocolli, cauliflower, bell pepper strips. Whatever I bought that we’ll be using in recipes.
Depending on what is on the menu for the next week or two, I’ll prep some of the proteins. I try to buy large packages of proteins, and re-package them with herbs and seasonings perfect for meals. Mostly chicken, because we don’t really eat all that much meat. Sometimes I’ll even prep ground beef into hamburger patties. This afternoon, I made chicken meatballs. I’ve included the recipe below.
Once the veggies are prepped and bagged, and the proteins are prepped and bagged, I get a bigger zip top bag and place everything needed for one meal into it, write on a sticky what it is, put the sticky on the bag and pop it into the freezer. Then we are all set to get cooking!
I try and prep a few crockpot meals as well. Salsa Chicken, Moosie’s Pot Roast are two great options. Crockpot freezer meals are perfect for those mornings when you know you’ll want a hot meal after work, but won’t be in the mood to cook.
I also like to break up large packages of cheese, like I did here. Less waste, and we’re less likely to eat all of the cheese quickly.
Making baked goods. I prefer to make muffins, brownies, and cookies at home, that way I can control the amount of sugar that the family consumes. I also add little healthy things: milled flax seeds, pumpkin, bananas. I try to do healthy swaps that aren’t really noticeable. This is a favorite cake in our house. It’s also great as muffins too. This time of year I also like to make Pumpkin Donuts too. YUM.
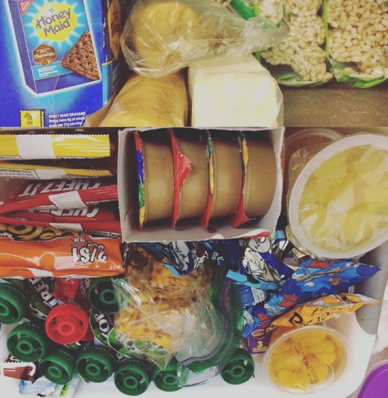
All of these things make meal planning a lot easier. Having ingredients already chopped, proteins mixed with seasoning, even snacks pre-packaged and set in a specific area of the kitchen.
I use a plastic Sterilite Basket to pack most of our shelf stable snacks that go into our lunches. I frequently skip buying large containers of pre-packaged snacks unless they are a better deal. If you notice, the goldfish are in Ziploc bags. The kids bring them home and I reuse them. But I only reuse them for more snacks.
I have a second shelf that stores all of our crackers (saltine, Ritz, graham, etc.) and puffed rice rolls, we eat those at other times besides lunch, but I grab them and pack them into individual containers or plastic bags for lunch as well.
Not shown are the lunch drinks which I have to keep hidden from the kids so they don’t drink them all after school/on weekends. I have a cache of goodies in the fridge and free to have in our lunches: fresh fruit, yogurt, cheese sticks, milk boxes, and bottles of water to choose from.
This “hack” aka pantry shortcut keeps my time making lunches a lot shorter, and I can spend more time with my kids!
Recipe: Ground Chicken Meatballs
Ingredients:
1 lb ground chicken
1 egg
3/4 cup panko breadcrumbs
1/2 of a white onion, minced
1 /2 Teaspoon of each: Salt, garlic powder, pepper
2 T
Directions:
Mix all ingredients (except oil) in a large bowl until well combined.
Divide mixture into 12-20 balls and roll between your palms until uniform in size.
Place meatballs on a cookie sheet or plate and stash in the freezer for 10-15 minutes.
Heat oil in large pan, fry meatballs in batches, and drain on a paper towel to blot out any excess oil.
Once meatballs are cool to the touch, place them in a freezer safe container with a lid or zipper top bag. Store in the freezer.
I like to make several bags of meatballs, and I put as many in a bag as we need for one meal. For us, that 6-8 large meatballs- about the size of a cutie tangerine.
These meatballs are great because they work with a variety of sauces and cuisines.
Talk Back: I’d love to hear about some of the ways that you use batch cooking and food prep to make your life easier! What is your favorite time saving kitchen “Hack”.
Times are tough for a lot of us right now. Coupons and deals are drying up left and right. Here are some ways that you can stretch your grocery budget without wasting time or energy.
The eternal question at Costco: Is Bigger Better? Learn about Price Per Unit here.
In addition to price per unit, you might consider starting a price book as well.
If you live in San Diego County, check out this list of Neighborhood Distributions all over the county. You can pick up 15-30 lbs of free produce each week. No proof of need is required. Just show up with your reusable grocery bags!
There are also food share programs in almost every community in the US. They provide low cost food boxes to families and individuals. A quick google search can help you find one near you!
In San Diego County, there are monthly distributions through the San Diego food bank at various locations. Colloquially called “commodities”, it’s officially called The Emergency Food Assistance Program (EFAP). Locations throughout the county distributes USDA food each month. If you live outside San Diego County, check with your local county or municipalities food bank network for more info on this service.
Don’t forget there are tons of money saving and rebate apps. My list is here.
Bartering: Most of us know someone with a backyard garden. Trade your skills (housecleaning, organizing, babysitting, car washing, you get the idea) for some home grown produce, or eggs (some of us live in areas where backyard livestock is ok). This may not be available to everyone.
Menu Planning is another great way to cut down on food waste- It’s a lot easier than you think once you get started.
Talk Back: I’d love to hear your tips for stretching your grocery budget!
We love Ice Cream! But, it can be expensive, a carton that’s not a half gallon can run upwards of $5.00 around these parts. Most cartons of ice cream are 1.5 to 1.75 quarts, that’s a decrease from 2 quarts or a half gallon just 10 years ago. Same price (or more) and less product. No thanks.
And honestly, there are a lot of weird ingredients in store bought ice cream. Food stabilizers, thickeners (like seaweed), and artificial flavors/colors. No thanks!
After meeting with a nutritionist recently regarding my big kids food issues stemming from sensory issues related to ASD, she recommended more full fat dairy products to help make sure he was getting enough fats in his diet. A kid can only drink so much milk, so I decided to make some ice cream from scratch.
I borrowed my parents Cuisinart Ice Cream Maker, which you can buy on Amazon, or probably at your local Bed Bath and Beyond. It makes 2 quarts at a time. It comes with a great cook book full of all kinds of great recipes and ideas.
After looking through that cook book, as well as looking through several of my own, and a quick internet search, I came up with several ideas on how to concoct some tasty ice cream. I asked the kids for flavor suggestions. Two choices were the big winners:
Peanut butter ice cream with chocolate chips- I opted to use PB Fit instead of blending peanut butter into the milk/cream/sugar mixture- so it would have a better texture. I was also worried that the extra fat from the peanut butter would mess with the fat ratio and inhibit the hardening of the mixture.
Chocolate Malt- I used the basic recipe below, but added 1/4 c malt powder. I buy a huge container of malt powder on Amazon every quarter, but you can get smaller sized containers at Walmart or in the grocery store.
Making Ice Cream is easy. If you’ve got an ice cream maker, you just mix up your ingredients, pour into the drum of the maker, put the lid on, flip the switch and 15-20 minutes, you’ll have a pretty soft ice cream. Scoop it into an airtight container with a lid (like Tupperware), and freeze it for about 2 hours. Then it’ll be hard enough to eat.
If you don’t have an ice cream maker, don’t fret, you can use two coffee cans (cleaned out of course), some ice, salt, and duct tape and make it at home- This is the method we used when I was a kid. You can read all about it here along with a true and funny story about making ice cream with kids. This is also a fun thing to do while camping- You can pre-mix the ingredients and take it in your cooler.
Here is the basic recipe I use. Please note that the ingredients used are chosen specifically for their fat content so the ice cream will be creamy. If you alter the ingredients at all, the ice cream will be gritty, grainy, or have ice crystals in it.
Ice Cream Base (makes about 1.5 quarts)
2 cups Heavy Whipping Cream- DO NOT USE half and half, fat free half and half or non-dairy creamer).
1 cup whole milk- You have to use whole milk or you’ll get ice crystals
3/4 c sweetener (I used white sugar, you can also use brown sugar, or 1 for 1 Splenda)
1 T Vanilla extract
pinch of salt
Directions:
Prepare Ice Cream maker as machine instruction call for, or set up your Coffee Can ice cream maker.
Place all ingredients into chilled mixing bowl, and mix with hand mixer until all ingredients are well blended,
Pour into cream cream maker.
Turn on ice cream maker, or start rolling your coffee cans!
Variations:
If you want to make my PB Fit ice cream, add 3/4 c PB Fit and 1/2 c. semi-sweet chocolate chips in step two.
Chocolate Malt ice cream is the base recipe with 3/4 cup cocoa powder, 1/4 c malt powder, and an additional 1/2 c brown sugar.
Now onto the economics: Is making your own ice cream cheaper? Usually, yes. We used flavorings that we already have on hand, and I recommend that you do the same- You know what flavors you like, and you probably already have some flavorings on hand.
32 oz. Whipping cream- $4.99
1 qt. Whole Milk .99
That’s enough cream to make 2 2-quart batches of ice cream.
You can watch a video of the ice cream maker going here, and don’t forget to follow me on Instagram too! I post all kinds of fun stuff there!
Disclaimer: I have linked to items on Amazon. If you click through and make a purchase, I may receive a small commission. Monies earned through commissions are used to offset the costs associated with running the blog (and the occasional cup of coffee).
Talk Back: What is your favorite flavor of Ice Cream? Have you ever made Ice Cream at home before?
Fetch Rewards is hooking us all up this weekend!! Starting today, earn 3,000 bonus points every time a friend enters your code and scans their first receipt! Plus, they’ll get 3,000 points.
3,000 points is enough for its own reward and there’s no limit on the number of referrals you can make! That means every person you refer to Fetch Rewards by Sunday earns YOU a reward and THEM a reward.
Don’t miss out on your chance to earn big this weekend – the referral bonus ends Sunday night!
So, if this seems like an app you’d enjoy, check this out: Use my code ND2TBwhen you sign up and you’ll score 3000 points after you scan in your first receipt with Fetch Rewards. That’s a $3 Amazon Gift Card (or whatever $3 Gift Card you choose). You can find Fetch Rewards in your app store.
You can learn more about Fetch Rewards here. I’ve been using it for about a year, and I’ve earned over $100 in Amazon GC, just by doing my regular shopping!
*In order for you and anyone you refer to qualify for the increased referral bonus, they must enter your referral code and complete a valid receipt now through 11:59 PM local time on Sunday, September 9th. After 11:59 PM on Sunday, September 9th, the referral bonus will return to 2,000 bonus points per referral.
We’re getting down to the end of the month, I’m 90% done with my goal list for August, and I thought it would be fun to start the week off with some awesome freebies!
I usually post this on Monday mornings, but I just finished organizing the pantry and freezer, so I thought I’d post it while my memory is fresh! School starts on Wednesday..Not that I’m excited or anything, but I can’t wait to get back to a routine for the entire families sake.
Breakfasts are usually the same for us: Protein shakes for grown ups, and pancakes or something along those lines for the kids. We have plenty of protein shake fixins’- I buy the over ripe bananas, peel and slice them pop them into ziploc bags, and freeze them for smoothies and protein shakes. I also keep sandwich ziploc bags of other frozen fruit on hand to make the kids smoothies when they request them (a few times per week). Berries, peaches, and mangos are pretty popular.
Lunches are leftovers, salads, or a protein shake for me and the Mister, and The Big kid has a specially packed lunch of whatever he’s into at the time (which changes frequently). Bitty Bird eats whatever I’ll feed her.
For dinner, when we’ve got busy days (like Mondays), I’ll try and put something in the crockpot in the morning, or pull something I’ve already prepped out that can be quickly cooked.
Monday: Homemade frozen pizza with watermelon slices
 Ok, so I’ve discussed Meal Planning
 All of these things make meal planning a lot easier. Having ingredients already chopped, proteins mixed with seasoning, even snacks pre-packaged and set in a specific area of the kitchen.
 Times are tough for a lot of us right now. Coupons and deals are drying up left and right. Here are some ways that you can stretch your grocery budget without wasting time or energy.
 It’s Friday and that means it’s time for freebies! This week there is a pretty good selection and variety!

 I borrowed my parents
 Peanut butter ice cream with chocolate chips- I opted to use
 Chocolate Malt- I used the basic recipe below, but added 1/4 c
  It’s Friday and that means it’s time for freebies! This week there is a pretty good selection and variety!

 We’re getting down to the end of the month, I’m 90% done with my goal list for August, and I thought it would be fun to start the week off with some awesome freebies!
 I usually post this on Monday mornings, but I just finished organizing the pantry and freezer, so I thought I’d post it while my memory is fresh! School starts on Wednesday..Not that I’m excited or anything, but I can’t wait to get back to a routine for the entire families sake.
