Meal Plan Monday: The First One of the Year!

dsc07997

WOO HOO! Time for a new year and a new week, and that means a new meal plan!

I’m just posting dinners for our meal plan. The kiddos lately have been having protein pancakes (I like Kodiak Cakes mix- it’s yummy and very versatile) with butter and Peanut butter. Hubs likes Oatmeal (my recipe for an easy almost instant oatmeal mix can be found here) if he’s got time, otherwise he and I have protein shakes. We mix it up, and have different flavors and mix in all kinds of stuff into our shakes, so as not to get bored. Here area few of our favorite recipes.

Lunches for Lil’ Man are usually Peanut butter and crackers, fruit, milk, a protein muffin (aka a kid cupcake), and applesauce cup. He takes his lunch every day! Hubs usually has a protein shake or I pack him leftovers or a frozen entree.

Bitty Bird and I usually have leftovers from the night before, or soup, sandwiches, quesadillas. She eats almost anything!

Monday:

  • D: Salsa Chicken with brown Rice and veggies

Tuesday:

  • D: Baked Ziti and steamed brocolli

Weds:

  • D: Frittata (with bacon and veggies)

Thursday:

  • D: Stir Fry (chicken and veggies)

Friday:

  • D:  Date Night (dinner out)

Saturday:

  • D:   breakfast for drinner

Sunday:

  • D:  Leftovers!

The menu may change, as  I pull stuff out of the pantry to rotate what we’ve got (I am trying to cut down on waste, and put the older stuff up front to get eaten first). Hubs is recuperating from the flu from hell and laryngitis, so we may end up having soup or stew one night. I stocked up on canned soups last week at Grocery Outlet, and I’ve also got a few containers of homemade soup/stew in the freezer.

12/18/17 Meal Plan Monday

dsc07997

I am really tired of not feeling well. First everyone got the gross tummy bug that was going around, now I have the Santa Ana triggered Sinus pain/nose drip. UGH. This week is going to be lots of soup and crockpot stuff. It’s been cold here at night (well, cold for us, in the low fifties and high forties), so soup will be nice.

I’m just posting dinners for our meal plan. The kiddos usually have a small toasted bagel with cream cheese for breakfast along with fruit.  Hubs likes Oatmeal (my recipe for an easy almost instant oatmeal mix can be found here) if he’s got time, otherwise he and I have protein shakes with frozen bananas and PB2.

Lunches for Lil’ Man are usually Peanut butter and crackers, fruit, milk, a protein muffin (aka a kid cupcake), and applesauce cup. He takes his lunch every day! Hubs usually has a protein shake or I pack him leftovers or a frozen entree.

Bitty Bird and I usually have leftovers from the night before, or soup, sandwiches, quesadillas. She eats almost anything!

Monday:

  • D: Going out- The kids and I are meeting some friends at the Zoo! Even though I feel like crap, I promised them we’d go.

Tuesday:

  • D: Vegetarian black bean chili

Weds:

  • D: Grilled Cheese & Chicken Soup

Thursday:

  • D: Smoothies and soup

Friday:

Saturday:

  • D:  Bean, Rice, and Cheese burritos

Sunday:

  • D:  Leftovers!

The menu may change, as  I pull stuff out of the pantry to rotate what we’ve got (I am trying to cut down on waste, and put the older stuff up front to get eaten first).

Meal Plan for the Week!

DSC07997

This week has been crazy, and it’s just Tuesday! Mr. is sick, so our usual routine has been thrown off.

I’m just posting dinners for our meal plan. The kiddos usually have a small toasted bagel with cream cheese for breakfast along with fruit.  Hubs likes Oatmeal (my recipe for an easy almost instant oatmeal mix can be found here) if he’s got time, otherwise he and I have protein shakes with frozen bananas and PB2.

Lunches for Lil’ Man are usually Peanut butter and crackers, fruit, milk, a protein muffin (aka a kid cupcake), and applesauce cup. He takes his lunch every day! Hubs usually has a protein shake or I pack him leftovers or a frozen entree.

Bitty Bird and I usually have leftovers from the night before, or soup, sandwiches, quesadillas. She eats almost anything!

We’re pretty stocked up of food for the next week or so- We’ll need milk, cream cheese, and cheese. I’ll probably hit up Costco tomorrow.

Monday:

  • D: Chicken Tortilla Soup and toast

Tuesday:

  • D: Soup and grilled cheese (While Mr. is sick, we may be eating a lot of soup)

Weds:

  • D: Breakfast for dinner

Thursday:

  • D:  Spaghetti Squash boats with Vegetable Marinara sauce

Friday:

  • D: Date Night! (we go out)

Saturday:

  • D:  BBQ hamburgers and BBQ veggies

Sunday:

  • D: Leftover buffet

The menu may change, as  I pull stuff out of the pantry to rotate what we’ve got (I am trying to cut down on waste, and put the older stuff up front to get eaten first).

Quick Dinner: Beefy Taco Skillet

Ok, so pictures with this post because I didn’t think about writing it down until after we had already eaten second helpings. I didn’t think you’d want to see a pic of an empty, dirty skillet.

This recipe is inspired by what I had in the cupboard. I really wanted tacos, but we didn’t have any of the usual fixins’, so I rummaged through the cupboard and the spice rack and here is what I came up with.

If you are wondering why didn’t I just go to the store, or send the Mister…. You mst be new here! I pride myself on being able to use it up, make do, or go without. But a woman should never be denied tacos, or a reasonable facsimile.

Beefy Taco Skillet (serves 6, maybe more)

Ingredients

  • 1 lb ground meat (I used beef, but you could use your fav. ground meat)
  • 1 can condensed tomato soup +1 can of water
  • 1 small tin tomato paste
  • 1 can beans, drained and rinsed (I used Sun’s Pinto beans with Jalapeños) Pintos, Kidneys, or black beans would all be good in this recipe
  • 1 white onion, diced
  • 1 bell pepper, dices (I used red)
  • 1/2 cup mushrooms slices (I used fresh, but feel free to use canned, drained and rinsed)
  • 2 cups cooked rice (I had leftover white rice in the fridge, but feel free to use brown if you like it better)
  • 1 packet taco seasoning
  • 2 cups shredded Mexican or Sharp Cheddar Cheese
  • Sour Cream (optional topping)


Directions

  1. Brown meat over medium heat, breaking it apart as you cook.
  2. Add chopped veggies. Cook until onions are clear.
  3. Add beans, soup, tomato paste, and taco seasoning. Simmer 10 minutes, until well combined and bubbling.
  4. Add rice and stir to coat rice and incorporate into mixture.
  5. Top with cheese and turn to low. Cover skillet, allowing cheese to melt, about 5 minutes.
  6. Top each portion with sour cream, as desired.

Serve with Tortillas and a green salad. Despite having a whole can of soup and water in it, it is not soupy at all. Cooking it on medium really tightens it up, especially once the rice is added.

When I make this again, I will be adding more veggies: 2 onions, 3 bell peppers (one red, one green, and once yellow), and 2 cups of corn kernels (probably frozen). I may also omit the can of water and add a can of salt-free diced tomatoes in their own juice. All of these changes will add bulk to the entree without adding too many more calories.

You could also top this with crushed tortilla chips and a little chopped cilantro (I am one of those people who can’t eat cilantro- it tastes like soap and makes my tummy urpy).


Frugal (and healthy recipe): Zucchini chips!

file000926780482.jpgWe’ve been blessed (?) with an abundance of yellow zucchini as of late. Friends with gardens and  a CSA box have brought us literally 10 lbs of yellow zucchini…. That’s a lot. So after making lasagna, stir fry, and zoodles, We were still left with 6 of those little yellow bastards, staring me in the face.

Screen Shot 2017-09-21 at 6.34.48 PM.png
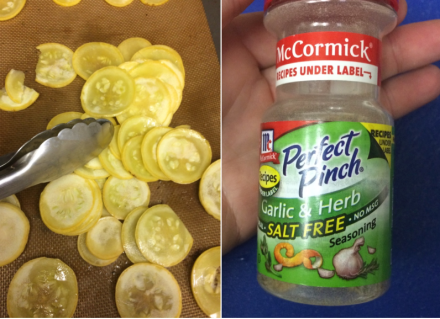
I googled “What to do with Yellow Zucchini” and the answers were shockingly, NSFW. However, deep in the recesses of Google were many recipes for baked chips.  Figuring it had to be better than my kale chips debacle (5 lbs of burnt, greasy kale bits, no thanks), I set off to work.

The first batch was too greasy, so the batch that’s in the oven now has far less oil (only 2 tablespoons). Hubs said they were tasty (albeit greasy), and even Itty Bitty gobbled a bunch down today (after I blotted them with a paper towel).

Screen Shot 2017-09-21 at 6.34.54 PM
Now, to wait…..

Feel free to sub in any herb or spice blend you like, I grabbed the first one off the spice rack.

Baked Yellow Zucchini Chips

Ingredients

  • 2 lbs yellow (or green) zucchini
  • 2 T. olive oil
  • 2 T (or more), your favorite salt free herb or spice blend
  • salt, to taste

Directions

  1. Thinly slice coins of zucchini- you can use a mandoline like this one, or a knife- whatever you’ve got.
  2. Blot them dry between two paper towels. I let mine sit between two paper towels for about 30 minutes.
  3. Toss with oil, and spread 1 layer on a cookie sheet topped with a sil pad (or you can use parchment paper- whatever you’ve got).
  4. Sprinkle oiled slices with herbs or spices.
  5. Bake at 225 degrees for a minimum of 2 hours. Check after 2 hours. Depending on how thick your chips are cut, it may take up to 2 1/2 hours.
  6. After they are room temp, then sprinkle with salt to taste. Store in a sealed container on the counter. They stay good for 3-4 days, but they won’t last that long.

Recipe: Lemon Garlic Spaghetti Squash Casserole

file000382147880.jpgWe love Garlic. It’s a good thing that hubs and I both like it, because otherwise this recipe wouldn’t go over too well.

This is my spin on the Spaghetti with Garlic White Wine sauce found here.  It appeared in hubs Facebook feed one day several months ago, he sent it to me, and we’ve been tweaking it to make it our own ever since.

To make it a little healthier, I added in 1 large spaghetti squash. If you’ve never cooked one, I write about it here. It’s super easy to cook, and it’s very yummy

Lemon Garlic Spaghetti Squash Casserole

Ingredients:

  • 2 large white onions, cut into quarters and layers separated
  • 1 T Olive Oil
  • Salt and pepper
  • 2 large lemons, zested and juiced
  • 4 T butter, divided
  • 6-8 cloves of garlic, minced (you can use more or less)
  • 1/2 t. red pepper flakes
  • 1/2 c. white wine
  • 1/2 T Thyme (I usually have it dried in my spice cabinet, but if you have it fresh, use 5-6 springs)
  • 1 c. Grated parmesan cheese, divided
  • 1/2 c chicken broth (or pasta water)
  • 1 large spaghetti Squash
  • If you want to add pasta to this dish, you’ll need 1/2 lb spaghetti, 8-10 cups water (to cook pasta), and salt (to salt the water)


Directions:

Preheat oven to 350.

Prep spaghetti squash (scoop out the stringy parts and seeds) and bake at 350 for 30-45 minutes.

Toss cut up onions in oil, salt and pepper. Bake in a baking dish covered for 20-30 minutes, uncover and bake an addition 10-15 minutes.

IMG_3202.jpg
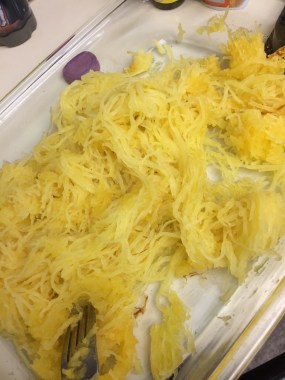
After the squash is done cooking, allow to cool for about 10 minutes, or until it’s easy to handle. Scoop the “meat” out and set aside.


IMG_3198.jpg
Baked onions, cooling, along with the butter needed to finish the recipe.

After onions are done baking, set aside.

If you are cooking pasta, start the water to boil and cook pasta as directed.

Zest and juice the lemons, set aside.


IMG_3197.jpg

Heat half the butter in a skillet. Once melted, add the minced garlic and cook on medium for 5-ish minutes until fragrant (watch out, it burns really easily). Add red pepper flakes.


IMG_3200.jpgAdd Lemon juice and wine, turn up the heat for a few minutes. You’ll want to cook off the alcohol, so about 5-10 minutes at medium high heat. Add the baked onions.

Add 2 T. chicken broth (or pasta water), and the remaining butter, and the Thyme. Once the butter is melted, turn off the heat.

Add the spaghetti squash and/or pasta into the skillet, and gently toss to coat. Add lemon zest, and half of the parmesan cheese. If the mixture becomes too thick, add more chicken broth or pasta water a little at a time.

Top with any additional cheese, thyme, and/or pepper flakes.

IMG_3206.jpg

Here is an extra step that makes it a little better (IMO) but isn’t needed: Place skillet under the broiler for 3-5 minutes, until the cheese on the top is brown and bubbly.

I have made this recipe with both pasta and spaghetti squash.  This last time I made it, I used only 1 serving of whole wheat spaghetti, mostly because I prefer the way it turns out when it has the pasta water in it, instead of the chicken broth.

*If you are a vegetarian, feel free to substitute in veggie broth.

**This recipe can be made with GF pasta.


Family Recipe: Apple Crisp

img_2334
When I was a kid, my mom made apple crisp probably once a week, it’s a huge comfort food for me (and probably my brother too). It’s yummy, cheap to make, and very filling. And as far as desserts go, it’s not really too unhealthy.

This recipe makes a 9×13 inch pan. I use a pan like this one. It’s got a lid, so you can take it to potlucks or store any leftovers in the fridge. Halve the recipe to make smaller sized batch. Honestly, after having it, you won’t want to make a small batch.

Ingredients:

  • 8-10 green apples (about 3-4 cups), peeled, cored and chopped (green apples work best- Granny Smith’s are nice).
  • 1/2 stick of butter softened (don’t use oleo/spread- it makes the crumble topping watery)
  • 1/2 c. packed brown sugar (light or dark, whatever you got!)
  • 1T. cinnamon or pumpkin pie spice (whichever you prefer)
  • 1 c. quick cook oats (raw!) (if you have a gluten intolerance, you can use gluten free oats)
  • 1/4 c All purpose flour ( if you have a gluten intolerance, you can use nut meal- I like almond meal. Sometimes when I make this GF, I omit the oats and increase the amount of nut meal to 3/4 c)

Directions:

  1. In the bottom of a greased baking dish, pour the apples in a even layer.
  2. In a small bowl, combine the remaining ingredients with a pastry blender (Or a fork, if you don’t have a pastry blender), until ingredients are all combined and crumbly.
  3. Pour crumbles over apples in an even layer.
  4. Bake at 350 degrees until apples are all soft and mushy, usually 30 -45 minutes. THe topping gets toasty and crispy as it bakes!
  5. Serve hot with whipped cream or ice cream. Also great cold, lukewarm, or any temp in between.

It’s so freaking good!

You can use fresh peaches, apricots, or berries instead of apples. They do need to be fresh and ripe (no frozen or canned fruit).

Tasty Chewy Brown Sugar Oatmeal Cookies!

Screen Shot 2016-05-31 at 6.11.51 PMDuring a recent pantry clean out, I discovered 3 pounds of brown sugar.

So, I unleashed my google fu to find a recipe to use some of it up. I discovered this recipe from The Pioneer Woman, but it didn’t quite meet our needs (aka what was in the kitchen). So with some changes, I whipped up a batch of chewy, yummy, spiced oatmeal cookies that are sure to please even the finickiest cookie monster!


I had to make 3 batches because they just kept disappearing!

Spiced Brown Sugar Oatmeal Cookies (Adapted from this recipe )

Ingredients

  • 1/2 cup (1 stick) Salted Butter, Softened
  • ½ cup coconut oil, room temperature
  • 1/2 Cups (packed) Brown Sugar
  • 1/2 cup white sugar
  • 2 teaspoons Vanilla Extract
  • 2 whole Eggs
  • 1-1/2 cup All-purpose Flour
  • 1 teaspoon Salt
  • 1/2 teaspoon Baking Soda
  • 2 teaspoons each: Cinnamon, allspice, ground ginger, nutmeg
  • 3 cups Old Fashioned Oats

Preparation

Preheat the oven to 350 F.

Beat together the butter, coconut oil, and sugars until fluffy. Beat in vanilla and eggs.

Mix together the flour, salt, baking soda, and spices in a separate bowl. Add it into the wet ingredients, mixing it until just combined. Mix in the oats until just combined. Don’t overmix!

Drop scoops/spoonfuls of dough onto a lightly greased cookie sheet, spacing them a couple inches apart. Bake for 12-13 minutes or until dark and chewy.  These cookies spread when you bake them, so make sure to give them room to grow!

Let them cool slight on the pan after removing from the oven, then transfer the cookies.

Makes 24-36 cookies (depending on the size cookie you make)


Review: #KABRITA Toddler Formula (Thanks #MomsMeet!)

Screen Shot 2016-04-13 at 5.39.47 PM

Recently I received a neat little box on my porch from Kabrita and Moms Meet.

It contained a canister of KABRITA Goat Milk Toddler Formula and fruit & yogurt pouches.

Immediately, Lil’ Man snagged one of the three pouches (well, not until I got this photo), and he retreated to the table to enjoy it. I gave the mixed berry to Itty Bittums, and she gobbled it up!

In the afternoon, I gave her a bottle of the Goat Milk Toddler Formula after she had some puffs and banana slices. She loved it, and I loved that it didn’t give her a rumbly tummy or gas. She’s got a sensitive tummy, and we had tried countless formulas to find one that made her tummy happy. Now that she’s getting older and is branching out to table foods, we are finding that some cow’s milk based products don’t agree with her.

Screen Shot 2016-04-13 at 6.25.09 PM
Someone did not want their photo taken today while enjoying her “milkies” as we call them

That is not the case with the KABRITA Goat Milk Toddler Formula! She is a happy little girl, and I’m a happy mommy! It’s super easy to mix up- Just one scoop per ounce of water. There is a handy little scoop in the canister.

What I love about the fruit & yogurt pouches is that they are great cold, frozen or at room temp. They come in three yummy flavors:Banana and Natural Vanilla Bean, Mixed Berry, and Mango Peach. I toss them in the freezer and slip one into Lil’ Man’s lunch bag, by lunch time, it’s nice and slushy! A perfect, healthy way to finish up lunch.

Did you know that Kabrita has a trial offer? You can learn more about it here.

Disclosure: I received this product for free from the sponsor of the Moms Meet program, May Media Group LLC, who received it directly from the manufacturer. As a Moms Meet blogger, I agree to use this product and post my opinion on my blog. My opinions do not necessarily reflect the opinions of May Media Group LLC or the manufacturer of this product.

Recipe: Honey Lemon Ginger Syrup

P1050863I’m no doctor, but I do know that when we don’t feel good, nothing is more soothing than lemon and honey.

IMG_3602I recently made a very soothing syrup, and I had to share it with you. I put 1/3 cup of the syrup in the bottom of a coffee mug and pour boiling water over it. I have been drinking a mug full twice a day.

It’s quick and easy to make!

Ingredients:

  • 2 C honey (real honey, none of that honey flavored syrup junk!)
  • Juice of 10-12 lemons (reserve two lemons and chop them up)
  • A Thumb sized knob of ginger, peeled and sliced

Directions:

  1. In a saucepan, combine the honey, juice, and ginger.
  2. In a jar with a screw on lid, pack in reserved chopped up lemon pieces.
  3. Cook on low for about 20 minutes. Do Not boil!
  4. Pour honey mixture over lemons.
  5. Screw lid on and let sit on counter until it reaches room temperature.
  6. Store in the fridge.
IMG_3603
Waiting for yummy syrup!
IMG_3601
Hunks of ginger

If you’re looking for the science behind all of this, Lemons contain a lot of vitamin C! Honey is very soothing and coats a sore throat. Remember that honey should not be consumed by anyone under 12 months of age. And ginger contains anti-oxidants.