Free E-Books!

mf809.jpgIf one of your New Year’s resolutions is to lose weight, eat better, and get healthy, here are a few awesome free e-books from Amazon. Remember, prices on Amazon can fluctuate- so it may not be free for long!


Talk Back: What is your favorite healthy snack?

DIY Tutorial: Bathbombs!

Screen Shot 2019-01-08 at 9.10.51 PM.png
They turned out pretty good!

In my goodie bag from Wow Summit a few months ago, we all received CBD oil balm from +CBDOil, and I wasn’t really sure what to do with it. It has a coconut oil base, so for me it was too greasy to use as a topical pain relief (I hate having greasy skin, and stuff like Tiger Balm and Ben Gay make my skin crawl). I had been using it as lip balm, but really, I didn’t need that much lip balm.


I have a few books on making your own beauty products, so I looked for a recipe for bath balms, as I seemed to recall that they called for oil to bind the other ingredients. I also did a quick internet search. I took 5 recipes and sort of Frankensteined together a really good recipe.

Most of these ingredients you have in your pantry already. Citric Acid (also called sour salt) can be purchased at Sprouts or whole foods in the bulk section, or in a grocery store with a large Jewish Food section. Or, of course… There is Amazon.

I weighed my dry ingredients using a food scale, so these measurements are by weight.

Screen Shot 2019-01-08 at 9.11.00 PM.png

Ingredients:

  • 4 ounces (by weight) Baking Soda
  • 2 ounces (by weight) Corn Starch
  • 2 ounces (by weight)  Citric Acid
  • 2 ounces (by weight) Salt (You can use Epsom salt, table salt, or Kosher salt)
  • 2 T. Water (more or less make be needed depending on the weather conditions at the time you make the bath bombs)
  • 1 T. +CBDOil Balm (it has peppermint oil in it, so I opted to add no additional essential oil)
  • Optional (but fun): natural food coloring. I used Watkins. Start with a few drops and add more until you get the color you want.


Directions:

  1. In a glass bowl, mix all dry ingredients together.
  2. Add balm, and stir until it starts to clump.
  3. Slowly add water, 1 tablespoon at a time.
  4. Add food coloring and stir.
  5. You can either use bath bomb molds like these, but I used a 1/3 cup measuring cup. I packed the cup, let it sit for a few minutes, invert, and gently tap the bottom of the cup until the bomb releases.
  6. Let them sit overnight before using.
Screen Shot 2019-01-08 at 9.19.31 PM.png
The Finished product, waiting to cure overnight. 

This recipe makes 4-6 bath bombs, depending on how big you make them.

If you don’t want to use CBD Oil, you can substitute coconut oil, and add in 10-15 drops of your favorite essential oil.

A few of my favorite Essential Oil Combinations include:

  • Lavender and Vanilla
  • Orange and Clove
  • Rose and Almond

Talk Back: Have you ever made bath bombs? Did you like it?


My New Favorite Cooking Oil: Malaysian Palm Oil!

Screen Shot 2018-12-15 at 10.41.45 PM.pngAt The Moms Meet Wow Summit last month, I was introduced to Malaysian Palm Oil. As someone who cooks daily, I’m always looking for new, healthy ingredients to incorporate into the family diet.

I’d never tried palm oil before, nor had I heard of it, so here are some cool things I learned:

  • Palm oil comes from the fruit of a special species of palm tree grown near the equator. Oil palm plantations are incredibly high yielding and also provide an environment where native animals can thrive. You can learn more here.
  • Palm oil comes from the palm oil fruit, not the tree itself, so there is no deforestation. Also each tree produces fruit all year long for up to 25 years! In Malaysia, palm oil is only produced on legal agricultural land in compliance with Good Agricultural Processes. Fifty percent of Malaysia’s land area is mandated forest cover.
  • It’s better for cooking as it is stable at higher cooking temperatures, is free of trans-fatty acids, rich in vitamin E tocotrienols, and red palm oil is also an abundant source of pro-vitamin A carotenoids.  Red Palm oil has more carotene than carrots and tomatoes.
  • I recently used the Malaysian Palm oil in place of Olive Oil when making Pizza Crust last weekend. It didn’t change the crust at all texture-wise, but it did give it more or a golden appearance and a more buttery flavor.
  • Overall, Malaysian Palm oil have a very velvety, butter mouth feel and taste.
  • I like that Malaysian Palm oil is a Non-GMO. More than 90% of other cooking oils (soy, corn, rapeseed/canola) is made from crops grown with genetically modified seeds,
  • Malaysian Palm oil is a natural substitute for partially hydrogenated oils (the trans fats). That’s great news for me, since I cook a lot of scratch!

Screen Shot 2018-12-15 at 9.30.53 PM.png
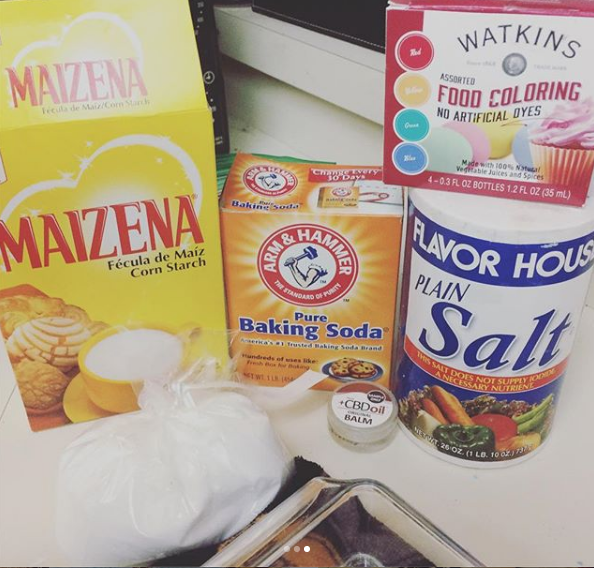
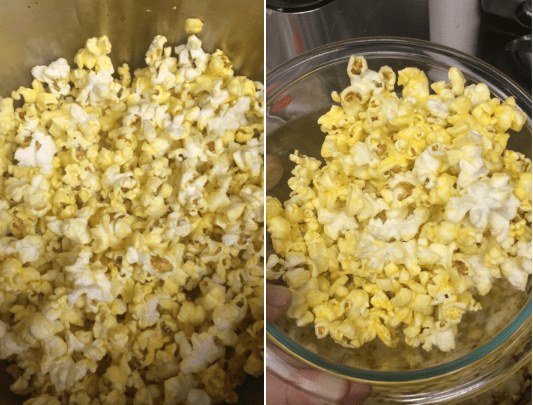
I wanted to showcase the oils natural buttery taste and feel, so I whipped up some popcorn on the stove top, the old-fashioned way.

Screen Shot 2018-12-15 at 9.31.27 PM.pngAll you need is:

  • 3 T. Malaysian Palm Oil
  • 1/2 C. popcorn kernels
  • Whatever seasoning you like (I like salt and pepper)

Directions:

  1. In a large pot (6+ quarts, I have this one), heat the oil and add 3 kernels. Cover with the lid,
  2. Cook on medium-high heat until kernels pop. Remove the pot from the heat, scoop out popped kernels, and add in the rest of the unpopped popcorn kernels.
  3. Cover with the lid, and give the pot a good shake (use potholders!). Let sit off heat for 30 seconds to 3 minutes.
  4. Put pot back on the heat (medium-high), set the lid slightly askew, so the steam may escape. Shake the pot a few more times. Once the popping starts, it pops quickly.
  5. Once the popping has slowed, remove from the heat and pour the popcorn into a bowl and top with desired seasonings, butter, etc.

A big thanks to the Malaysian Palm Oil Council for the bottle of Palm Oil and Popcorn to try out this recipe. All opinions are my own and I was not compensated.

I can’t wait to substitute Palm Oil into my favorite recipes!


Setting up a Family First Aid Kit!

file0001924831000.jpg
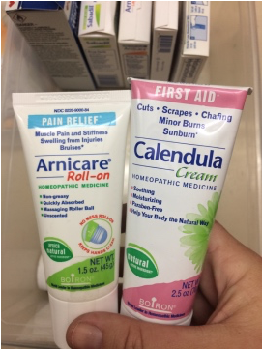
When you have kids or are accident prone (like I am), a comprehensive first aid kit is a must. After so many years and iterations, this is the first aid kit that works best for our family.

Screen Shot 2018-11-08 at 7.12.38 PM
Before!

Earlier this week, I set to clear out any old/expired ointments, medications, bandages (they don’t expire, but they can become… unsticky), and re-organize. The kids were asleep, so it was the perfect time to get started. I did have one helper. Fiona. Her idea of help was to jump into the first aid box whenever it was empty.

A few years ago, we started off with a pretty well-stocked First Aid Kit, which you can see in the photos is the black, cloth, zippered pouch.  Since we take it camping with us, I’ve also added tampons (They have practical first aid uses as well), Arnica cream, extra scissors, hemostats, and hand sanitizer. It lives under our bathroom sink, and is easily accessible in case of emergency. It’s great- I’ve replaced stuff as we’ve used it, but it’s really not an “All you need” when you are accident prone.


Screen Shot 2018-11-08 at 7.13.21 PM
The aftermath!


Screen Shot 2018-11-08 at 7.12.43 PM
I love both of these products!

In addition,  we need burn cream, stuff for bruises, Wart Remover kit (little boys!), Cold Calm, Oscillococcinum (for flu like symptoms), Arnicare (which is awesome for leg cramps), a temporal scanner thermometer, Ben Gay (Don’t Judge!), CBD oil products, Rubbing alcohol, hydrogen peroxide (not shown), and exam gloves (which are great for stuff besides cleaning up owies). For that, I turned to a Sterilite plastic shoe box without a lid- I’m sure it broke years ago.

Once all of the old/gross/expired stuff was disposed of safely, I scrubbed out the box, labeled it, and repacked it. Because this box does not have a lid on it, it’s kept on the top shelf of the linen closet.

I really want to thank the awesome folks at Boiron for hooking me up with free products at last weeks Wow Summit. I love their products! I have been a fan for years. I bruise like a grape, so Arnicare gel and roll-on are life.

Screen Shot 2018-11-08 at 7.12.50 PM
My Helper, Fiona!

Talkback: I’d love to hear what’s in your family’s First Aid kit! If you don’t have one, now is your chance to grab a plastic tote and get started!


Women’s Health Week!

Womenshealth.gov - National Women's Health Week!
It’s only fitting that Women’s Health Week starts on Mother’s Day. While not every woman is a mother, everyone has a woman they care about in their life. National Women’s Health week is May 13- May 19, 2018.

The Women’s Health Week website has all sort of great guides and resources all about how women at any stage of life can care for themselves. And they are SIMPLE STEPS!

Here are just a few daily choices that women can make to live a little more healthier:

  • Eat healthy — go to ChooseMyPlate.gov to get started
  • Get at least 30 minutes of physical activity
  • Get at least 7 to 8 hours of sleep

See, baby steps!

A few other helpful hints that are good for your body & mind as well as your wallet…

If you have health insurance, don’t forget to get your annual check-up/exam (it’s covered for free under all health insurances in the US)! You can take that time to address health questions with your PCP. If you don’t have health insurance, many Planned Parenthood Clinic offer annual exams (in addition to annual reproductive health exams) for free or very low cost.

pexels-photo-382420.jpeg
Getting outside with a friend (or pet) is a great way to relieve stress!

If you don’t belong to a gym or health club, many employers offer discounts or work with gyms to offer discounted memberships.  If you aren’t a gym person, check out your local parks. Lots of parks in our local area have special walking loops and even fitness stations (Mast Park in Santee has both!). Other parks in San Diego with fitness/exercise stations include: Mission Bay Park,  Embarcadero Parks North & South, Tidelands Park near the base of the Coronado Bridge as you arrive in Coronado, Hilton Head Park in Rancho San Diego, Chollas Lake Park, and Morley Field (near Balboa Park). If your local park doesn’t have a fitness course, play on the jungle gym or go for a walk!

Taking care of your skin is a great way to practice a little self-care and relax. Here is my DIY Frugal Facial.

And the easiest step I can recommend to better your health: Have a glass of water! We have all sorts of water bottles at home, including infuser bottles like this one. The kids each have a water bottle too!

And if you are a budget, don’t forget to check out freebie sites for health and beauty freebie- I’ve gotten free SPF, skin care products, a pedometer, and vitamins!

I’d love to hear from you: What simple steps do you incorporate into your life to improve your health? Guys, you can comment too!  Better health is for everyone, not just ladies!


Recipe: Colonial Chowder

stemarie_1650sfortentrance.JPG
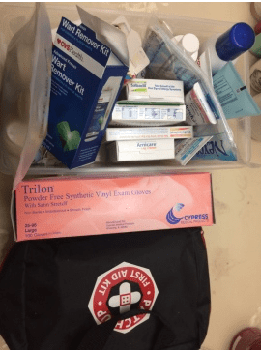
My mom found this recipe in a local paper years ago in a column called “Making it Light”. The basic gist of the weekly article was to take crazy fat and calorie laden recipes healthy.

The problem becomes that that a lot of the changes that are made are so super drastic that the food no longer resembles the original recipe.  Since both recipes are published within the article, my mom was able to combine parts of each recipe to make something tasty and healthier than the original. I don’t have a link or a photo of the article or the original recipe, since it’s been over 20 years.

Without Further Adieu…. Colonial Chowder

Ingredients:

  • 2 T. Butter
  • 4 slices of bacon, finely diced (or you can use 1/2 cup of pre-cooked bacon crumbles)
  • 1 lb. boneless, skinless chicken breasts, cut into bite size pieces
  • 1 large yellow onions, diced
  • 4 ribs of celery, diced
  • 3 large carrots, diced
  • 3 potatoes, peeled and cut into chunks
  • 1 tsp. of each of the following: basil, oregano, thyme, sage
  •  Bay leaves (I usually use 2-3)
  • 6 cups chicken broth
  • 1.5 cup frozen corn, or 1 can rinsed and drained salt free corn kernels
  • 1 can cream-style corn
  • 1 can evaporated milk
  • Salt and Pepper to taste
Directions:
  1. In a large stock pot, melt 1 T. butter, and cook bacon.
  2. Add chicken and cook chicken until no longer pink.
  3. Add onions, and cook until translucent (about 5 minutes)
  4. Add remaining carrots, celery, potatoes, and chicken broth. Cook over medium heat, until potatoes are soft.
  5. Add both types of corn, and milk. Cook over medium/low for about 20-30 minutes.
  6. Add Salt and pepper as needed. Serve with Cheddar biscuits.

This recipe serves 8-10, freezes well, and makes great leftovers!

This recipe is naturally gluten free. It cannot be made vegetarian/vegan.

Chocolate Chip Protein Cookies!

img_8846.jpgI know today is Pi Day, but Henry doesn’t really like pie (except Cheesecake), and I’m always looking for ways to get more protein into my buddy. He has a lot of food aversions, so most meat is a no-go (I don’t really count the occasional chicken nugget he inhales), same with beans, lentils, peas, and most other traditional sources of protein.

And who doesn’t love chocolate chips cookies…..

On the Back of the Kodiak Cakes Power Cakes mix I noticed that they say you can swap their mix  1 for 1 with flour, leavening, and salt in any baking recipe. Challenge accepted!

I turned to my favorite chocolate chip cookie recipe, the one on the back of the Tollhouse Chips Bag.

Making a few modifications based on what we had in the house, and we were ready to bake!

Here is the Original Recipe. One thing I really recommend is to cream the butter (basically use the electric mixer to “fluff up” the butter) for 30 seconds to a minute before adding the sugars.

IMG_8851.jpgIngredients:

  • 2 1/4 cups Kodiak Cakes Mix
  • 1 cup (2 sticks) butter, softened
  • 3/4 cup granulated sugar or Splenda (I used baking Splenda)
  • 3/4 cup packed brown sugar
  • 1 teaspoon vanilla extract
  • 2 large eggs
  • 2 cups Nestlé Toll House Semi-Sweet Chocolate Morsels


IMG_8852.jpg
Cookie Dough

IMG_8853.jpg


Directions:

  1. Cream the butter for 30 seconds to a minute.
  2. Add Sugars and mix until combined.
  3. Add eggs one at a time, and mix completely before adding second egg.
  4. Add vanilla, Kodiak Cakes mix, blend until dough forms.
  5. Stir in chocolate chips.
  6. Spoon 1 Tbs. blobs onto a greased cookie sheet or a silicone cooking pad on a cookie sheet. I love Sil pads.
  7. Bake at 375 for 8-10 minutes.

Here are the calorie stats for the entire batch of cookies and per serving, which is 2 cookies. I serve Henry 2 of these with an 8 ounce glass of milk. So the total protein for his snack is 12 grams.

Screen Shot 2018-03-14 at 10.25.08 AM.png

Screen Shot 2018-03-14 at 10.25.02 AM.png

This recipe makes 5 dozen cookies.

Do you have a secret to getting your kids to eat more protein?

2 freebies from Kroger Stores!

I love that the Kroger Stores do a free Friday Download coupon most weeks. It’s a chance to try new food for free.

This week both Food4less and Ralphs have a different freebie!

Screen Shot 2017-12-29 at 4.59.12 PM

The Food4Less freebie is a spicy one!FREE Doritos Dinamitas Receive ONE (1) FREE Doritos Dinamitas, any variety (4.25 oz.). Available in most stores. Exp 01/14/2018

Screen Shot 2017-12-29 at 4.59.23 PM

Ralphs Freebie is for those of us trying to eat a little healthier!FREE Del Monte Fruit Refresher or Fruit & Chia Receive ONE (1) FREE Del Monte Fruit Refresher or Fruit & Chia (14 oz.). Available in most stores. Exp 01/14/2018

If you are new to Free Friday Downloads from Ralph’s, here is more info about how it works:

WHAT IS FREE FRIDAY DOWNLOAD? An exclusive benefit to having an account online at ralphs.com is FREE products (yes, we said FREE!). When you download the free product coupon, it will be loaded directly to your Shopper’s Card and applied at checkout in-store.

HOW DOES IT WORK? Visit this page on Fridays

DOWNLOAD the digital coupon for the free product (make sure to download between 12:01 am and 11:59pm PT). View the coupon under ‘My Coupons’ in your account online or in the mobile app.

You have two weeks to redeem this coupon in store! Pick up the product at your local Ralphs store and digital coupon will automatically apply at checkout.


Recipe: Oatmeal Mix

file0001801761525.jpg

We love Oatmeal, but most instant oatmeal is full of sugar and isn’t really good for you (no fiber, lots of sugar, mystery ingredients).

Determined to save money and get us to eat better, I set out to concoct a batch of oatmeal mix.  After months of trial and error, here is the final result:

Oatmeal Mix

Makes 40 1/2 cup servings

Ingredients

  • 15 cups old fashioned oats (that’s 1 large canister)
  • 3 2/3 cups nonfat dry milk powder
  • 1 cup flax seeds, milled
  • 1 cup Hemp Seeds (I like these)

Directions

  1. In a large mixing bowl, mix together all of the ingredients.
  2. Store in a large air tight container for up to 6 months.

Directions for cooking the mix:

1/2 cup mix to 1 cup water, cook on the stove together until the oats are cooked (2-3 minutes). Or mix together and cook in the microwave for 2 minutes and let stand for a few minutes.


Add dried fruit, powdered sweetener, spices/herbs, what have you to make it your own!

How to save money without coupons: Part Two- Produce!

Yesterday I talked about how to save money without coupons when buying meat. Today I’m going to talk about fruits and vegetables!

peppers

There are seldom coupons for fresh fruit or vegetables.

Usually when you find coupons for either, they are lower in value or you must purchase another item (like cereal, croutons, something not super healthy or inexpensive).

Here are some ways you can incorporate fruits and vegetables into your grocery budget and diet without breaking the bank!

My number one money saving tip when it comes to produce is: Eat fruit and vegetables when they are in season. Food in season is cheaper because there is a surplus of it. 

Living in So. Cal, I’m kind of spoiled in that we can grow and eat most fruits and veggies year round. But if you live some place where it snows or has cold winters, eat produce when it’s readily available.

If you aren’t sure when certain fruits and veggies are in season, check out the Produce for Better Health Foundation website here. They have lists based on season.

Tip Number Two: If you gotta eat fruit out of season (sometimes in December, you just gotta have strawberries), buy frozen fruit. Frozen berries are so juicy and flavorful. Frozen fruit is the fruit that is too ripe to sell in stores fresh, so it’s cut up and flash frozen. It contains all of the nutrients that are found in fresh fruit.

Tip Number  Three: If you grow your own fruits, veggies or herbs: Freeze, dry, or can/preserve whatever you won’t eat right away. That way you’ll have some when the weather turns.

I love to make jam and pickles. It’s really easy and you don’t need any special equipment. We don’t grow enough tomatoes to can our own, so I pick up fruits and veggies when they are really cheap and in peak season and make jam or pickles then. And you can definitely can more than just Cucumbers!

If it is something that interests you, here are a few books that I like:

If you want to get the canning gadgets that make canning a little easier, here is the kit that I bought years ago: Back to Basics 286 5-Piece Home Canning Kit I love the funnel!

Tip Number  Four: When fruit or veggies are on sale, stock up. That may sound weird, but most produce can be frozen. With the exception of raw potatoes and lettuce I think you can clean, chop, and store pretty much any fruit or veggie in the freezer. Speaking of frozen….

Fresh produce is always the best, but a close second is frozen. Occasionally frozen veggies are on sale. If they are types/varieties you like, stock up!

Canned fruit/veggies are my last resort. Why? Because, for the most part, they are canned in syrup or juice (fruit) or salt-laden water (veggies) and they are usually cooked and some of the nutrients leech out into the liquid they are cooked/canned in, and most of the time that liquid is discarded.

HOWEVER- I love salt-free canned tomatoes in recipes for all kinds of stuff, and Lil’ Man loves him some salt-free canned green beans.  Sometimes you can find low/no salt added canned vegetables.

I have found that when I calculate price per unit (more info here), blueberries and some other fruit is cheaper at Costco! So don’t overlook your large club stores.

Tip Number Five: Check outyour local 99 Cent Store (like 99 Cents Only), produce stands, and the markdown section of your supermarket. All three usually have inexpensive produce that is good quality. It may not be the prettiest produce, but that’s ok!

How do you save money on your produce?