My Laundry Favs: More than Good Smells.

Clean laundry is more than good smells.

Stain removal, like removing the deodorant residue on the underarms of shirts, can lead to a buildup.

Removing smells from body oil and dead skin flakes. Pretty gross!

Using the right kind of detergent, laundry booster, sand tain removal – These can all be hard to figure out.

These days, it’s three of us, plus the cat, but I do one load of laundry a day, sheets and blankets weekly. It’s a lot of work. Thankfully, I have a system worked out.

We’ve had hard and or mineralized water in our area, so I use the following:

Scent Booster. I use the Arm & Hammer brand. I avoid fabric softeners as they are waxy and can leave a film on your clothing that can capture dirt and dead skin flakes.

Laundry detergent. Right now, I am using Arm & Hammer liquid detergent. Some people prefer powder. I prefer Arial for powder. It cleans very well and does not have an overwhelming scent.

Stain Removers. There are many types of stain removal products; some are general-purpose, and there are also some that remove stains based on the type of stain.

  • For blood stains, I use this Carbona Stain Remover. It works better than saliva and hydrogen peroxide.
  • For general stains, I use Spray and Wash 
  • For greasy stains, I use a combination of Blue Dawn and a little bit of rubbing alcohol, scrubbed with a toothbrush. This really helps get grease stains out.
  • For General whitening/stain removal boosting, I add 1/4 cup Biz and 1/4 cup Oxyclean to my wash. Biz is great for overall stain removal. These two products cannot be used in conjunction with bleach products.
  • For my whites: I use bleach. This is usually only on my towels and sheets.

I do not use dryer sheets.

Beyond Laundry:

To maintain my washing machine, I clean it up once a month with these tablets. We don’t have a dog, but a couple of us have longer-ish hair, and Fiona the cat loves to shed. Another thing that helps keep your washing machine smelling fresh is leaving the lid open when it’s not in use. And wiping down the gasket inside the lid once a week.

I maintain my dryer by cleaning the lint trap after every load, and using a brush like this one in the lint trap about once a week. We get the dryer vent cleaned once a year. It is a little costly ($100), but it really cuts down on the time the dryer needs to dry the clothes, and it reduces fire risk in our home.

We also use cloth laundry hamper bags on a hanging system (similar to this one) in my closet. I wash those bags approximately once a month. And for the hard plastic laundry baskets, I wiped them out with a disinfecting wipe about once a week.

And as for all of the hangers, I use a hanger rack like this one.

Frugal Home Repairs…

DSC_0039.jpg

Drip…Drip…Drip. Just the thought of that sound gets my hackles up! Recently, our master bathroom faucet started to drip. In a matter of a few days, the drip became a tiny stream.

Armed with our trusty Home Depot Repair guide, I looked through the plumbing section and found the section that applied. I headed off to Home Depot to buy a faucet puller.

Sometimes home repair manuals aren’t enough. Thankfully there are so many great videos on Youtube. These videos are often made by professional plumbers or tool/hardware companies. They can be a very valuable resource, especially if you are a visual learner.

This is the video that was the most helpful. Step by step directions, helpful tips, and it was realistic as to how much work it would take.

I am a DIY-er from way back, but even I know my limitations. Working as a team, we were able to take the faucet apart, install the new part and put it back together. Now it’s dripping a lot less.

The problem isn’t 100% fixed, but we’re still working on it. That’s the other thing about DIY home repair- Sometimes it’s not a quick 5-minute fix. Sometimes it’s a multiple-day, multiple trip to the hardware store, watching lots of Youtube videos, googling the same question in different ways.

This was the 3rd home repair I had tackled in the past 6 months. The other two were pretty easy, relativity speaking (replacing the flushing mechanisms in two separate toilets- both were different).

Here is my advice if you endeavor to tackle home repairs:

  • Google is your friend. Look up information before you get started.
  • Youtube can be a lifesaver! Check out multiple videos, especially videos made by professionals.
  • Check out the home repair book selection at your local library. While I linked to the book we used on Amazon, most branch libraries have all sorts of books on home repair.
  • Ask the dudes at the hardware store. The guy in the plumbing section of our local Home Depot told me he was a plumber, but he retired and picked up a couple shifts at Home Depot a week to keep busy. He gave me a bunch of tips, talked me through the process, and congratulated us on doing a job ourselves.
  • Hit up your tribe! Post a request for help on Social Media, shoot an email out to your peeps. You would be surprised how many people have done their own home repairs and may have tools to borrow, tips to share, or can lend a hand.

Talk Back: Are you a DIY Home pro, or are you intimidated by a toolbelt? Brag about your best home repair!


As an Amazon Associate, I earn from qualifying purchases, thank you for clicking through my links! For more information about affiliate programs and the links I use, check out my disclosure page.

Easy Home Maintenance: Cleaning Your Box Fans!

Screen Shot 2019-09-15 at 7.35.48 PM.png
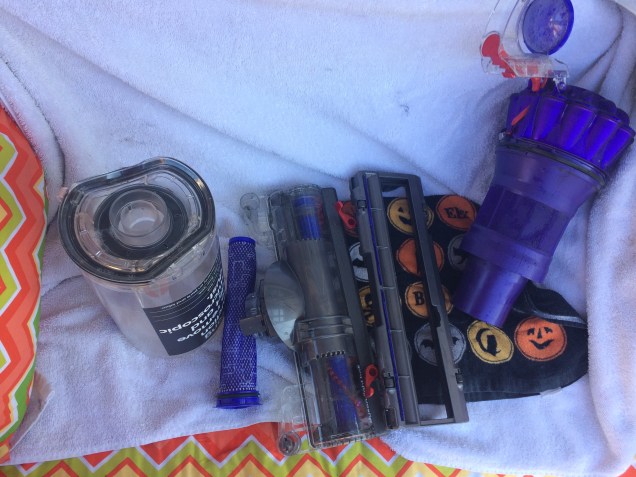
Recently, we noticed that our box fans weren’t providing much cool air. Before dropping over $150 to replace them all, I decided to see if cleaning them would improve their airflow capabilities. After all, they were still functioning mechanically, they weren’t putting out the air flow they used to.

With temperatures in excess of 80 degrees almost all year round here, box fans are a needed appliance in our home. We can’t go without them, as running the AC is cost-prohibitive.

IMG_7562.jpg
Oh dear.

These fans are all about a year old, and while I have vacuumed the front and back of them previously (I do it once a week), they had never been taken apart and cleaned.

Gather all the tools needed before you start. For this job you will need:

  • A sheet to cover your work area.
  • A screwdriver (our fans all have Philips head screws)
  • A dish to hold the screws while the fan is disassembled
  • All-purpose cleaner. I used Comet Lilac Bliss- it’s what we had in the house, and it worked really well.
  • A stiff-bristled brush. I used the brush I use to scrub the soap scum/hard water deposits out of the bathtubs (like this)
  • Rags or really scratchy paper towels. You need something that will trap the dirt.
  • Vacuum Cleaner with a brush attachment.
IMG_7564.jpg
Before: This stuff was tough to scrub off!
IMG_7580.jpg
Once again, my Dyson Vacuum saves the day!
59166257278__479FF905-70DB-489B-B11F-0BBCA1E137B7
After: So fresh and so clean!

Here are my tips for deep cleaning your fans-

    1. UNPLUG THEM! It seems like a no-brainer, but I’m going to remind you to not clean appliances that are still plugged in.
    2. Remove the front and back plastic pieces of the fan. Ours were held together with 6 screws.
    3. To remove the dirt/fuzz/cat/hair/whatever grossness that was on the fan front and back, I placed them in the bathtub and sprayed them down with all-purpose cleaner. I allowed them to sit for about 20 minutes while I cleaned the fan blade and fan case.
    4. Using all-purpose cleaner and a rag, carefully spray and wipe the fan blades, both front and back sides.
    5. Using the vacuum hand tool with the brush attachment, clean the interior of the fan case, as well as the backside of the fan motor. I was amazed at the amount of fuzz, dirt, and hair was around the intakes for the fans.
    6. Once the fan blades and fan case are clean, return to the bathroom and scrub the fan front and back. Rinse and dry completely.
    7. Reattach the front and back to the fan case, plug in and test out. All 6 fans worked 100% better after being cleaned. This is now a chore that has been added to the end of season home cleaning list.
59166291978__07924000-427B-4CC9-9DA7-44378FEC658D
Re-assembled and working like new!

Cleaning all of the fans took about 2 hours, and that included time to make snacks for two very starving kids, let the cat in and out a few times and help with math homework. Without distractions, I could have gotten done in about an hour.

In the future, I may invest in some of these Box Fan Filters, which until today I had no idea existed.

Taking care of appliances, like these box fans is just another way that we are able to extend the useful life of often-used items in our homes, and that saves us money in the long run.

Talk Back: What types of small things do you do to extend the life of your small appliances?

Home Maintenance: Cleaning your Vacuum

IMG_6712.jpgI know, I know. It’s hilarious to think that you should clean an appliance that is designed to clean, but really, if you think about it, if a vacuum cleaner is clogged with dirt and hair it can’t do its job.

And that sucks (see what I did there?).

After reading the manual that came with our vacuum, I set to work.

IMG_6704.jpg
Freshly Cleaned

First, I took the canister off, dumped it in the trash, removed the filter, and washed them both. I used the blue Dawn dishwashing liquid. For the canister, I used a brush like this.

IMG_6703.jpg
Strings, hair, and a PIPE CLEANER???

Then I removed the brush housing assembly, removed the soleplate, and clipped the hair and thread off the beater bar (that’s the thing that goes round and round and has little brushes on it). Once the beater bar was clean, I washed the soleplate and brush housing assembly.

IMG_6702.jpg
Before being cleaned, but after being de-fuzzed.

I used a smaller brush like this, and also a straw cleaning brush to get into the tiny nooks and crankies. I think for next time I’ll be ordering a set like this:

It’s got all the size brushes you’ll need to clean out vacuum cleaner’s various parts. 

After everything was clean (it took about an hour, that included interruptions from the kids who needed snacks, cartoons, etc. And of course, the cat was starving and needed food RIGHT.NOW), I set them out on the patio bench on an old worn out towel that I use for cleaning. IMG_6706.jpg

The next day everything was bone dry and I re-assembled the vacuum cleaner and took it for a test drive. It was like using a brand new vacuum!

I clean my vacuum about once every six months. It helps keep it in good running order, which means it will last longer. Our previous Dyson lasted us 11 years, and I’d love for this one to last at least 11 years!

If you want to try it, I recommend that you check the owners manual for tips and instructions!