When I was a kid, my mom made apple crisp probably once a week, it’s a huge comfort food for me (and probably my brother too). It’s yummy, cheap to make, and very filling. And as far as desserts go, it’s not really too unhealthy.
This recipe makes a 9×13 inch pan. I use a pan like this one. It’s got a lid, so you can take it to potlucks or store any leftovers in the fridge. Halve the recipe to make smaller sized batch. Honestly, after having it, you won’t want to make a small batch.
Ingredients:
8-10 green apples (about 3-4 cups), peeled, cored and chopped (green apples work best- Granny Smith’s are nice).
1/2 stick of butter softened (don’t use oleo/spread- it makes the crumble topping watery)
1/2 c. packed brown sugar (light or dark, whatever you got!)
1T. cinnamon or pumpkin pie spice (whichever you prefer)
1 c. quick cook oats (raw!) (if you have a gluten intolerance, you can use gluten free oats)
1/4 c All purpose flour ( if you have a gluten intolerance, you can use nut meal- I like almond meal. Sometimes when I make this GF, I omit the oats and increase the amount of nut meal to 3/4 c)
Directions:
In the bottom of a greased baking dish, pour the apples in a even layer.
In a small bowl, combine the remaining ingredients with a pastry blender (Or a fork, if you don’t have a pastry blender), until ingredients are all combined and crumbly.
Pour crumbles over apples in an even layer.
Bake at 350 degrees until apples are all soft and mushy, usually 30 -45 minutes. THe topping gets toasty and crispy as it bakes!
Serve hot with whipped cream or ice cream. Also great cold, lukewarm, or any temp in between.
It’s so freaking good!
You can use fresh peaches, apricots, or berries instead of apples. They do need to be fresh and ripe (no frozen or canned fruit).
My kids love popsicles. If given the choice, they’d eat them all day. So I figured, why try to fight it? I’m turning into the skid and embracing their love of frozen food on a stick.
Recently, I was sent this awesome Lebice Popsicle mold kit. Right now it’s on sale for about $8.00. Remember Amazon prices change frequently!
It makes 6 good sized frozen nummies, a stand to keep them upright while they freeze, a collapsible funnel, and a small brush to clean out all the nooks and crannies.
After I washed them, I pulled out the blender and whipped up strawberry banana breakfast popsicles (if they are going to demand popsicles in the morning, might as well make them healthy, right?). I keep over ripe bananas sliced in the freezer in ziploc bags for morning smoothies and protein shakes, as well as whatever berries are in season. I buy them on sale, and freeze them before they go bad. It’s a great way to keep fruit on hand!
Strawberry Banana Popsicles
Makes 6 popsicles
Ingredients
1 1/2 cups Vanilla Greek Yogurt (or use whatever you have onhand, it doesn’t have to be Greek)
1 cup frozen strawberries
1 cup frozen banana slices
1/4 milk
Directions
Set up molds in stand.
Blend all of the ingredients together, until smooth.
Pour mixutre into mold, leaving about a 1/2 inch at the top.
Snap lids/sticks on, stash in freezer for 6-8 hours.
Remove from stand and run molds under warm water to loosen. Pop popsicles out of molds, and enjoy!
I also like making instant pudding (adding in frozen bananas or raspberries) and pouring that into popsicle molds too. That is a sweet and satisfying dessert!
I like that the stick and drip tray are attached and I’m not finding mystery popsicle sticks all over the house. The entire set is very sturdy and I know we’ll be using it for years to come.
Thanks to Lebice and Tomoson for providing the awesome popsicle mold! I received no financial compensation for this post, and all opinions are my own!
Everyone loves something easy. And I like something healthy too. So when I can find food that’s easy to prep and healthy, I’m in! I love doing breakfast prep once a week. It keeps us out of the drive thru, and that helps our bottom line.
As part of the Pinterest Generation, I’ve seen and tried TONS of make ahead/batch cooked breakfasts. All with little success (not fails, really, but nothing that I’m super excited to try again or share). Here are two favorites at our house:
It seriously doesn’t get any easier!
Ingredients:
2 packages of 8 count Sausage links (I used Farmer John)
2 tubes 8 count biscuit dough (I scored a 2 pack at 99 Cents Only)
Directions:
Cook and drain sausage links per package directions. Set aside.
Preheat the oven to 350 degrees
Open biscuit dough package and roll out biscuits until flat.
Place sausage on flattened biscuit, roll up dough, encasing sausage.
Bake for 12-15 minutes. Remove from oven and cool on wire baking rack.
Once cool, store in zip top bag or container with a snap top lid. Can be stored in the fridge for up to a week, but really, they won’t last that long.
Makes 16 rolls.
Add a cuppa Joe and you’ve got a quick, filling breakfast.
And if you prefer to start your day with fruit and something rich and creamy, check out our parfait recipe (it’s seriously a no-brainer!) Inspired by my love of the McDonald’s parfaits. I’m serious, since they changed over to Greek yogurt, my mouth waters every time I glance at the Golden Arches. You can make your own at home in just a few minutes!
I make a batch once a week! I use Ball canning jars (like these) that originally had home made jam in them (thanks Mom!), but you can use whatever jars or reusable containers you have on hand.
Ingredients:
2-3 cups frozen fruit- I like berries, but feel free to use whatever is on sale or you have on hand. Skip melon, mango, banana, or pineapple- You may find them frozen, but they won’t taste very good or have a good texture in this recipe.
1 large carton Vanilla Greek Yogurt (it’s about 4 cups)
Honey, if desired
Directions:
In each container, pour in 1/4 cup yogurt.
Top yogurt with 1/2 cup frozen fruit.
Repeat layer of 1/4 cup yogurt. Drizzle with honey, if desired.
place a few pieces of fruit on top, gently pressing down into the yogurt if needed.
Screw on lid and refrigerate.
Makes 6-8, depending on sizes of jar and type of fruit used. If you need “crunchies” on your parfait, individually portion out 1 cup of cereal and stash them in the cupboard. I use the snack sized bags like these and portion out cereal, then put the portions in a tub like this one. It lives on the counter. No more cereal mysteriously being eaten in one sitting. Really, who is going to open a bunch of little bags into a big bowl and pig out?
Another tip I have for you is: Set up your coffee maker before you go to bed. For those with a classic coffee maker, it’ll just be a quick flip of the switch to get your coffee fix. We have two French Presses, I set them up at night, one I fill with cool water and steep over night to make iced coffee in the morning for myself. I prep the other with grounds and fill the Tea Kettle for a hot pot in the AM for the Mister.
I turn on the stove in the AM and in less than 10 minutes, he has a steaming cuppa Joe and I am already on my second iced coffee!
That looks like a pretty good lunch, right? It was free! And what you don’t see is two little boxes of raisins that Lil’ Man basically chugged (they really are nature’s candy!). Pizza, nectarine, applesauce, Apple juice, and a bag of carrots.
There were other side choices as well, including a mixed green salad, brocolli, mandarin oranges, celery, and ranch for dipping and fresh salsa too.
Here’s the deal.. It’s not a deal. The USDA sponsors the Summer Food Service Program, open to all kids aged 2-18 years. No proof of need is required, and you don’t need to sign up in advance. Just find a location near you (here– this is for San Diego County only, for all other areas, click here), show up, the kids pick their lunches, and enjoy!
Most locations offer lunch Monday-Friday at a specific time, and some locations even offer breakfast too!
This is a great way to stretch your budget over the summer (and get the kids out of the house!). Locations differ, but include schools, rec centers, and parks.
It’s back! After a long hiatus, I’m back to meal planning! If you are new to meal planning, check out my article on how to get started here.
This week I’m starting off by doing a quick fridge and pantry inventory, and making a batch of cookies.
Monday:
D:Baked Ziti, steamed veggies
Tuesday:
D: Indian food (Chicken Korma, steamed rice, steamed veggies)- I have a kit!
Weds:
D: breakfast for dinner (probably pancakes, eggs, and sausage) and fruit salad
Thursday:
D: Salsa Chicken with brown rice
Friday:
D: Bean and veggie enchiladas, green salad
Saturday:
D:Veggie and cheese egg bake
Sunday:
D: Leftovers
Lil’ Man has started eating a small toasted bagel with cream cheese for breakfast along with yogurt and fruit. Mr. C has been eating Oatmeal (from a awesome recipe I found online and altered) every AM, and I usually have an HMR Protein Shake, or I’ll make myself a bagel too.
Lunches for Lil’ Man are usually a grilled cheese, yogurt, a granola bar, and fruit (cut up apple, orange, or banana). I have leftovers or a frozen entree, and Mr. C usually a salad or leftovers or an HMR protein shake (He did the program last year and really digs on the shakes), or he has a business lunch and opts for a salad and lean protein.
Recently I received a neat little box on my porch from Kabrita and Moms Meet.
It contained a canister of KABRITA Goat Milk Toddler Formula and fruit & yogurt pouches.
Immediately, Lil’ Man snagged one of the three pouches (well, not until I got this photo), and he retreated to the table to enjoy it. I gave the mixed berry to Itty Bittums, and she gobbled it up!
In the afternoon, I gave her a bottle of the Goat Milk Toddler Formula after she had some puffs and banana slices. She loved it, and I loved that it didn’t give her a rumbly tummy or gas. She’s got a sensitive tummy, and we had tried countless formulas to find one that made her tummy happy. Now that she’s getting older and is branching out to table foods, we are finding that some cow’s milk based products don’t agree with her.
Someone did not want their photo taken today while enjoying her “milkies” as we call them
That is not the case with the KABRITA Goat Milk Toddler Formula! She is a happy little girl, and I’m a happy mommy! It’s super easy to mix up- Just one scoop per ounce of water. There is a handy little scoop in the canister.
What I love about the fruit & yogurt pouches is that they are great cold, frozen or at room temp. They come in three yummy flavors:Banana and Natural Vanilla Bean, Mixed Berry, and Mango Peach. I toss them in the freezer and slip one into Lil’ Man’s lunch bag, by lunch time, it’s nice and slushy! A perfect, healthy way to finish up lunch.
Did you know that Kabrita has a trial offer? You can learn more about it here.
Disclosure: I received this product for free from the sponsor of the Moms Meet program, May Media Group LLC, who received it directly from the manufacturer. As a Moms Meet blogger, I agree to use this product and post my opinion on my blog. My opinions do not necessarily reflect the opinions of May Media Group LLC or the manufacturer of this product.
I’m no doctor, but I do know that when we don’t feel good, nothing is more soothing than lemon and honey.
I recently made a very soothing syrup, and I had to share it with you. I put 1/3 cup of the syrup in the bottom of a coffee mug and pour boiling water over it. I have been drinking a mug full twice a day.
It’s quick and easy to make!
Ingredients:
2 C honey (real honey, none of that honey flavored syrup junk!)
Juice of 10-12 lemons (reserve two lemons and chop them up)
A Thumb sized knob of ginger, peeled and sliced
Directions:
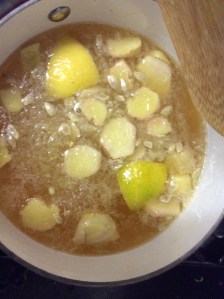
In a saucepan, combine the honey, juice, and ginger.
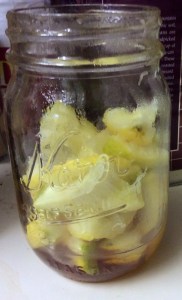
In a jar with a screw on lid, pack in reserved chopped up lemon pieces.
Cook on low for about 20 minutes. Do Not boil!
Pour honey mixture over lemons.
Screw lid on and let sit on counter until it reaches room temperature.
Store in the fridge.
Waiting for yummy syrup!Hunks of ginger
If you’re looking for the science behind all of this, Lemons contain a lot of vitamin C! Honey is very soothing and coats a sore throat. Remember that honey should not be consumed by anyone under 12 months of age. And ginger contains anti-oxidants.
Henry loves to garden. He loves planting seeds, watering, talking to the plants , and harvesting the fruits and veggies (even if he isn’t too hip on eating them all-yet!)
I think that it’s because of our heritage. My Maternal Great-Grandfather was a farmer in Minnesota.
Since we live upstairs in a condo, we don’t have 40 acres to plow and sow. So, like many urban farmers, we turn to container gardening. I have a growing Pinterest Board dedicated to container gardening, and I encourage you to join it!
Here are a few ways that we were able to start our garden on a budget:
I kept my eyes peeled on Craigslist free section for pots, I also put feelers out on social media for anyone getting rid of pots. That’s how we scored an awesome clay pot for our wild flowers!
We purchased heavy duty plastic pots at 99 Cents Only. They have a great selection of basic gardening tools, pots, planters, and tomatoes cages- all for $1.49 or less!
I found a great deal on seeds at Dollar Tree. I was able to pick up this box of seeds for only $1.00! I only used part of the box, since we don’t have a lot of room for our flowers. In addition to American Seed brand, they also had some Burpee brand seeds!
Most gardening stores are having sales right now- check out your local shop and see what kind of plants are on sale! We picked up a huge bag of soil, organic tomatoes (complete and in a planter with a cage), Green Bell Pepper, a 6 pack of strawberries, and a lavender bush for less than $50. We opted to purchase some plants in addition to seeds, just so Henry doesn’t lose interest in our garden (waiting for a tomato seed to grow into a bush is mind-numbing).
We are saving money on water too! Whenever it rains, we get out our rain buckets and collect as much as we can. It usually is only a few gallons, but we are able to use that water and not turn on the tap.
If you are new to gardening and aren’t sure what to plant or where to plant, check out Sunset Magazine’s Climate Guide. It will give you the ins and outs of when and what to plant. Luckily here in San Diego, it’s pretty temperate all year, so we can plant a lot of different plants.
Some of you may be wondering why we are growing wild flowers and lavender, since neither will produce any food. Well, no food for us, but food for bees! Without bees to pollinate the flowers on our fruit and veggies plants, there would be no food for us to harvest and enjoy! I try to plant flowers each year to entice the bees to visit our garden!
Our Garden Stones!
Last year we hand garden stakes with the names of our crops written on them. The sun faded them in no time. This year, we opted to do garden stones. I found a great project on pinterest and changed it up based on our needs.
We were recently gifted with two HUGE boxes of craft supplies and they contained these really cool wooden Whirligig/spinners (kinda like these). All we had to do was paint them! We quickly painted them up and added them to our planters!
I think gardening is a wonderful project for any family. It can be as small as a tomato plant on your patio, or as big as renovating your backyard to have a mini-farm! Gardening teaches kids about the life cycle of plants, and how to care for something else. I think it’s important that everyone know where food comes from, and how hard it can be at times (especially when you are waiting for it to ripen), so that we don’t take for granted our food.
Talk Back: I’d love to see your gardens too! Please comment with a photo, or let me know what you are growing!
One of my favorite websites to help me plan out shopping trips is Hot Coupon World. They have a Coupon Insert Schedule here. Remember if clipping coupons isn’t your thing, but saving money is, check out my list of Smartphone apps that can save you the big bucks!
Here are just a few of the new coupons that have me excited:
We love bananas, but sometimes they get over ripe before we can eat them all. That usually only happens when the weather is so hot and muggy- or if I buy too many. In that case, I peel, slice and bag them in snack sized zip top bags and toss them in the freezer. They are now perfectly portioned for smoothies or baking recipes! This week, I’m posting my favorite Banana bread recipe. It’s quick, easy, and it uses no white sugar, so it’s ideal for those watching their sugar intake.
I’ve included variations for various diets below.
Ingredients:
1/2 cup Stevia or brown sugar splenda (or 1/4 c honey)
1/3 cup applesauce
4 egg whites
1/2 cup of ripe banana (about 3-4 ripe bananas)
3/4 cup almond meal or flax meal
1 cup all-purpose flour
1 teaspoon baking soda
1/4 teaspoon baking powder
Directions:
Combine the first 4 ingredients in a large mixing bowl with electric mixer until fluffy and creamy.
Add in the remaining ingredients until smooth.
Pour batter into 1 greased loaf pan.
Bake at 350 for 50-60 minutes.
Slice and serve hot or allow to cool, wrap in aluminum foil and store in the freezer for up to 3 weeks.


 It seriously doesn’t get any easier!
 Inspired by my love of the McDonald’s parfaits. I’m serious, since they changed over to Greek yogurt, my mouth waters every time I glance at the Golden Arches. You can make your own at home in just a few minutes!


 I’m no doctor, but I do know that when we don’t feel good, nothing is more soothing than lemon and honey.
 I recently made a very soothing syrup, and I had to share it with you. I put 1/3 cup of the syrup in the bottom of a coffee mug and pour boiling water over it. I have been drinking a mug full twice a day.


 We were recently gifted with two HUGE boxes of craft supplies and they contained these really cool wooden Whirligig/spinners (kinda like


